
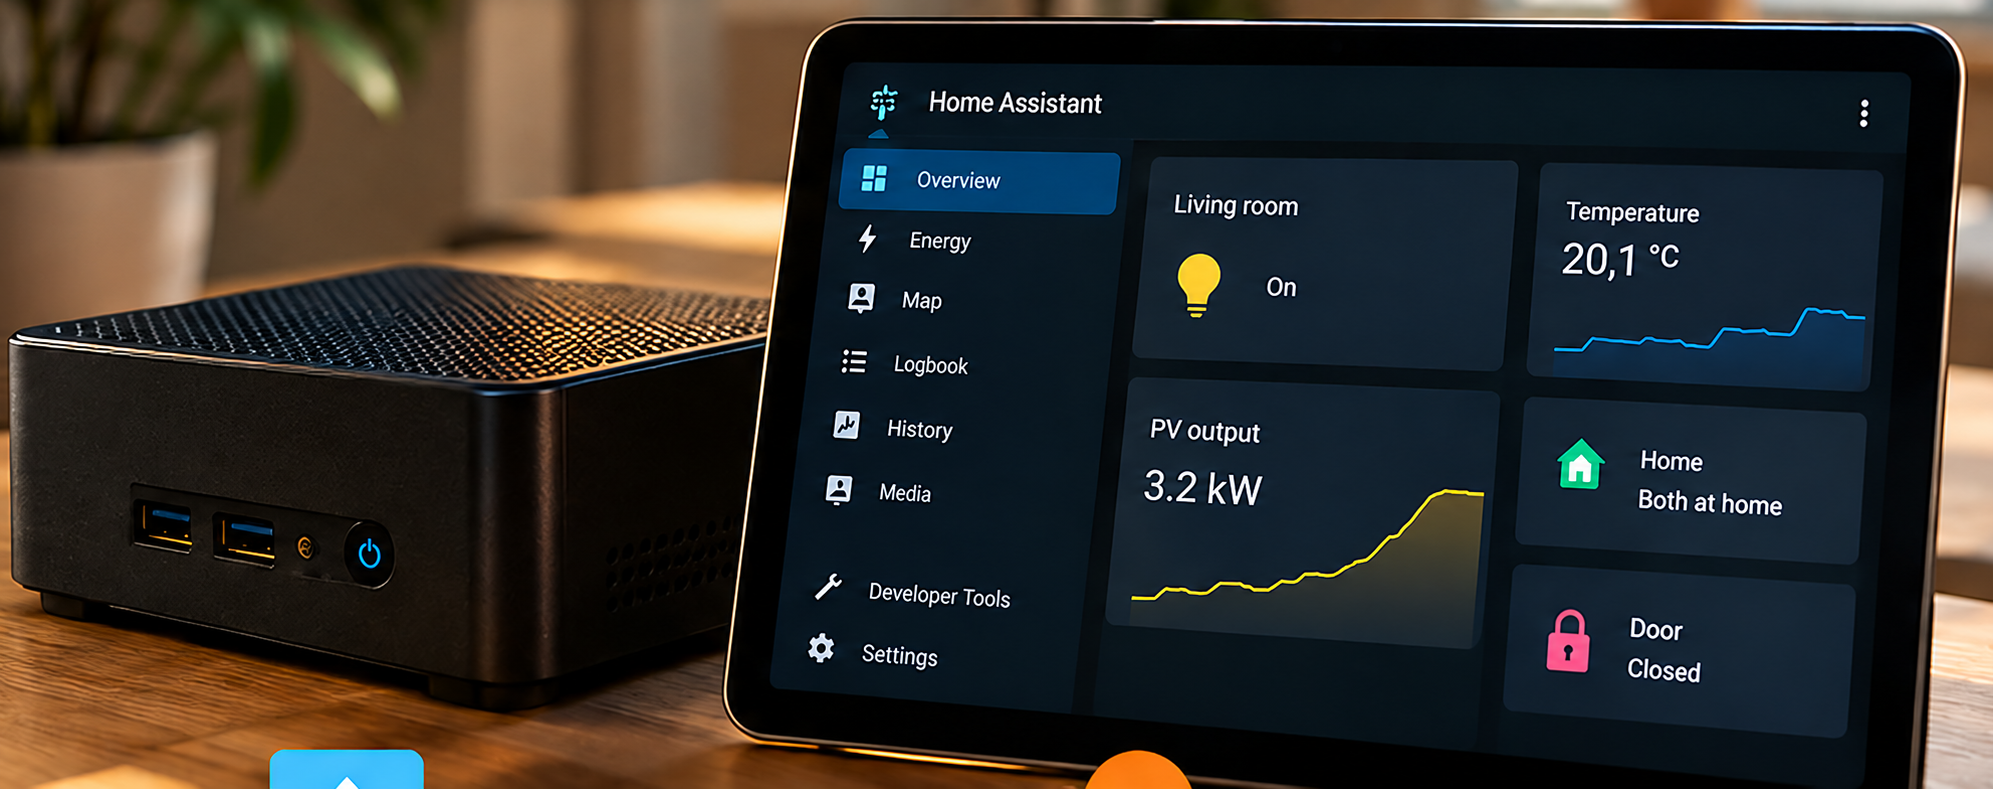
Sign in safely from away from home without opening a port on your router. This guide sets up Home Assistant through Cloudflare Tunnel. We start with the basics and finish with a real check: can you reach Home Assistant through your domain while your own internet connection does not directly expose Home Assistant or your router's management interface?
Home Assistant runs locally on your own hardware. We arrange remote access through Cloudflare.
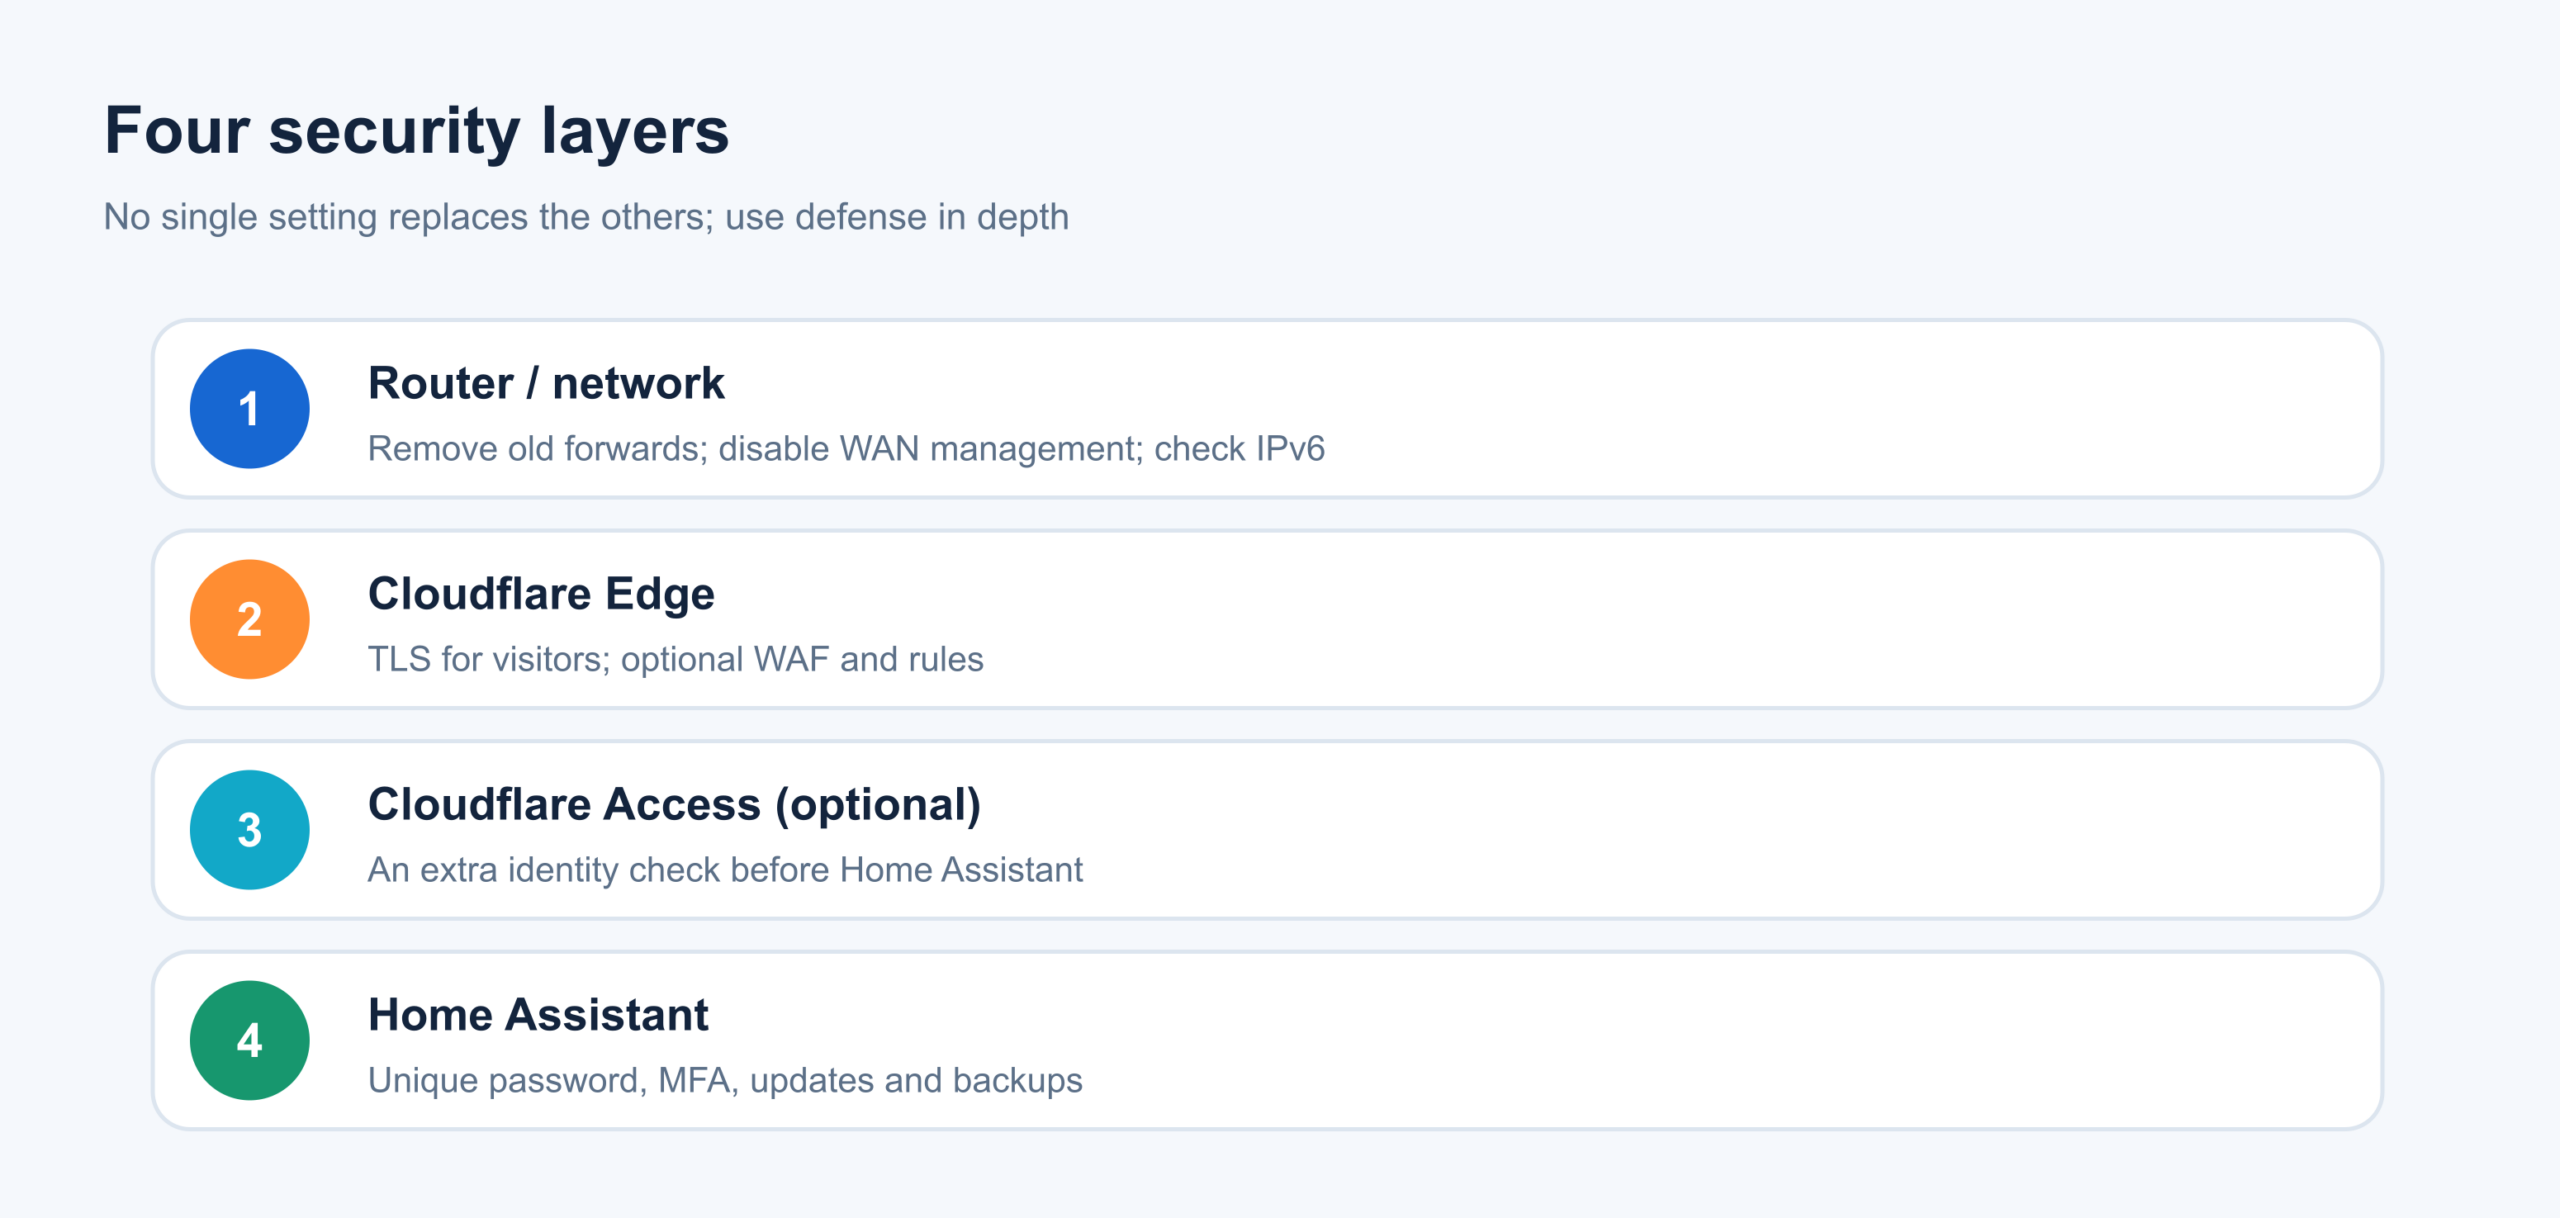
Before you begin: Cloudflare Tunnel does not replace a strong password, multifactor authentication, updates, or disabling router management on the WAN side. We use several security layers. This article uses only example addresses and contains no real passwords or tunnel tokens.
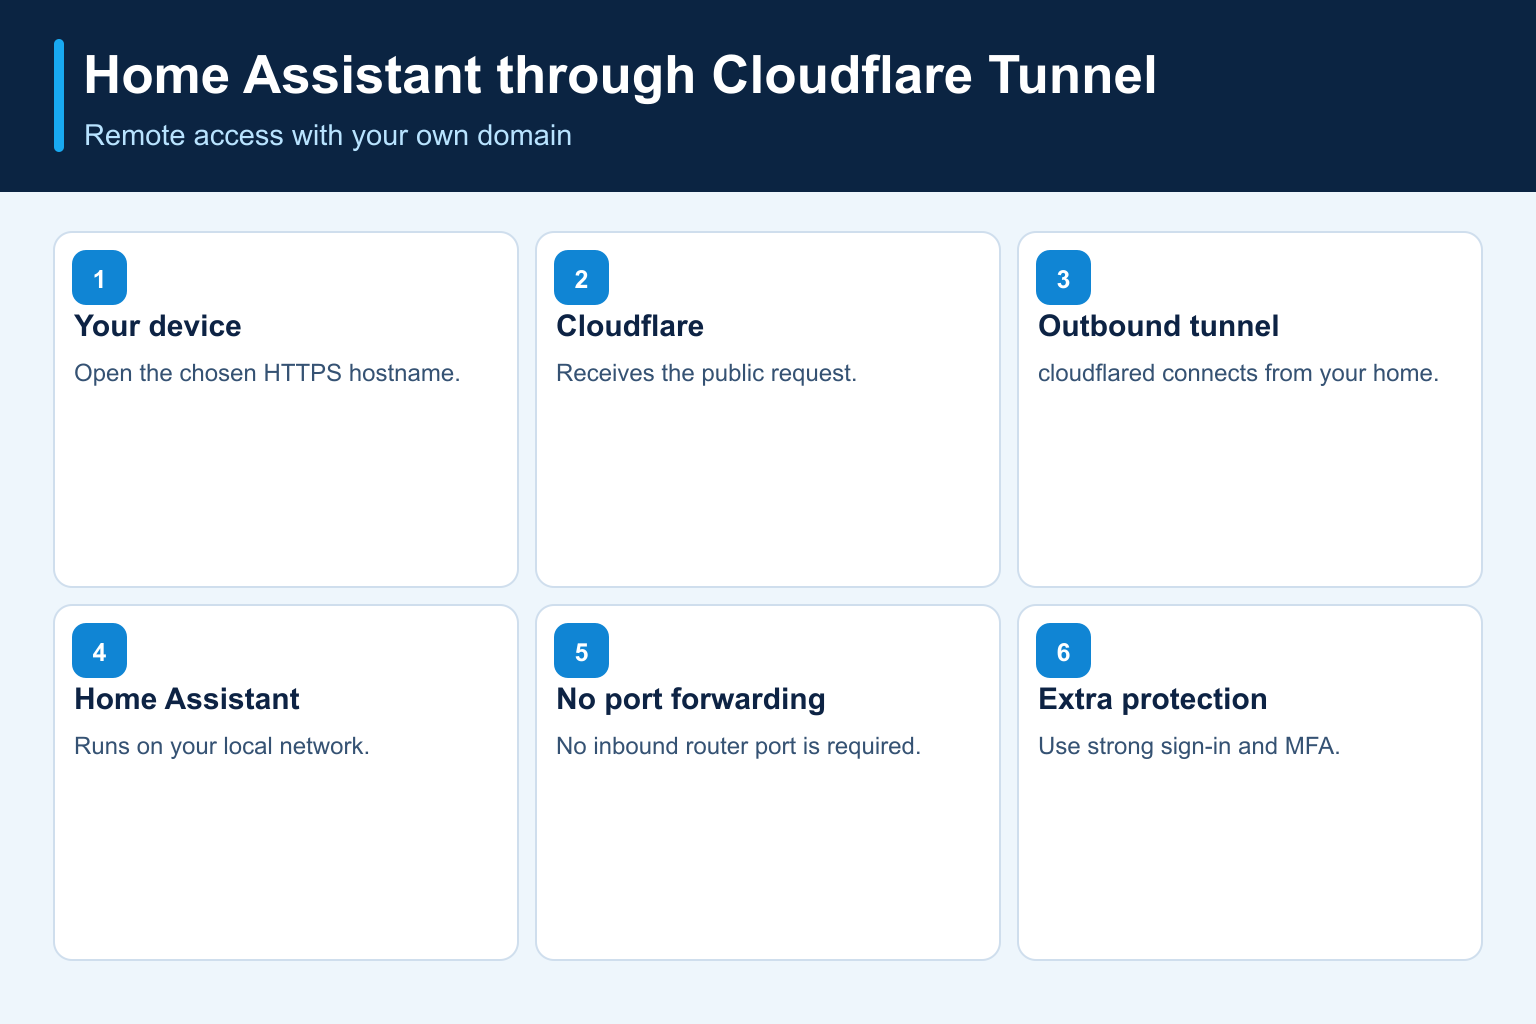
In brief: what are we building?
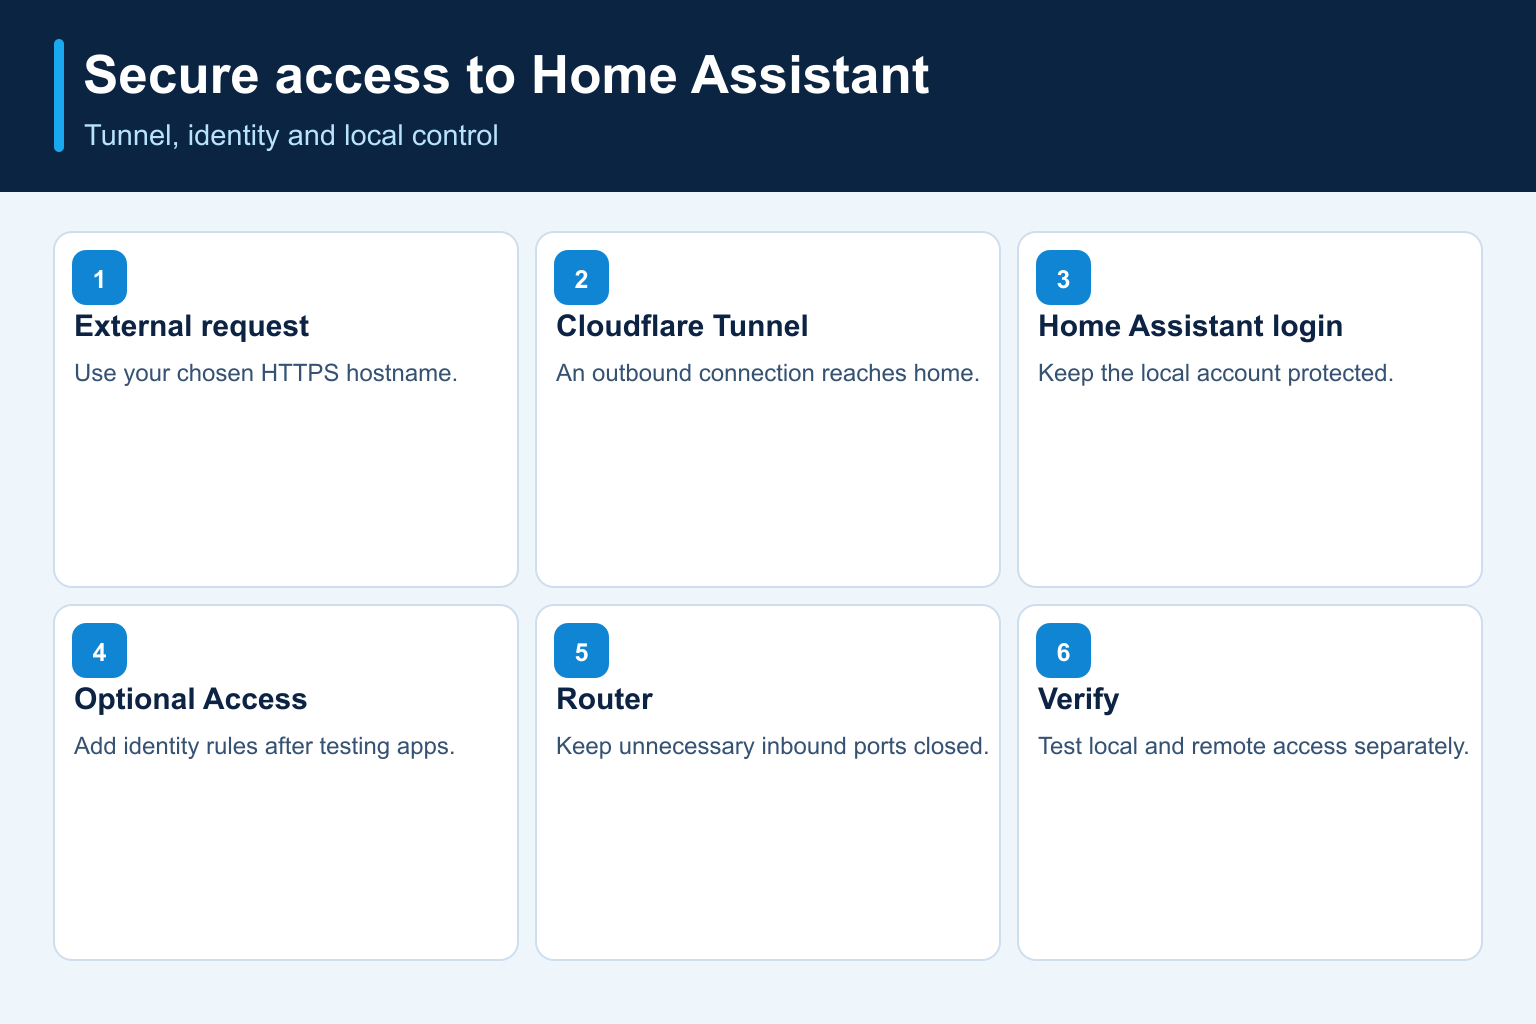
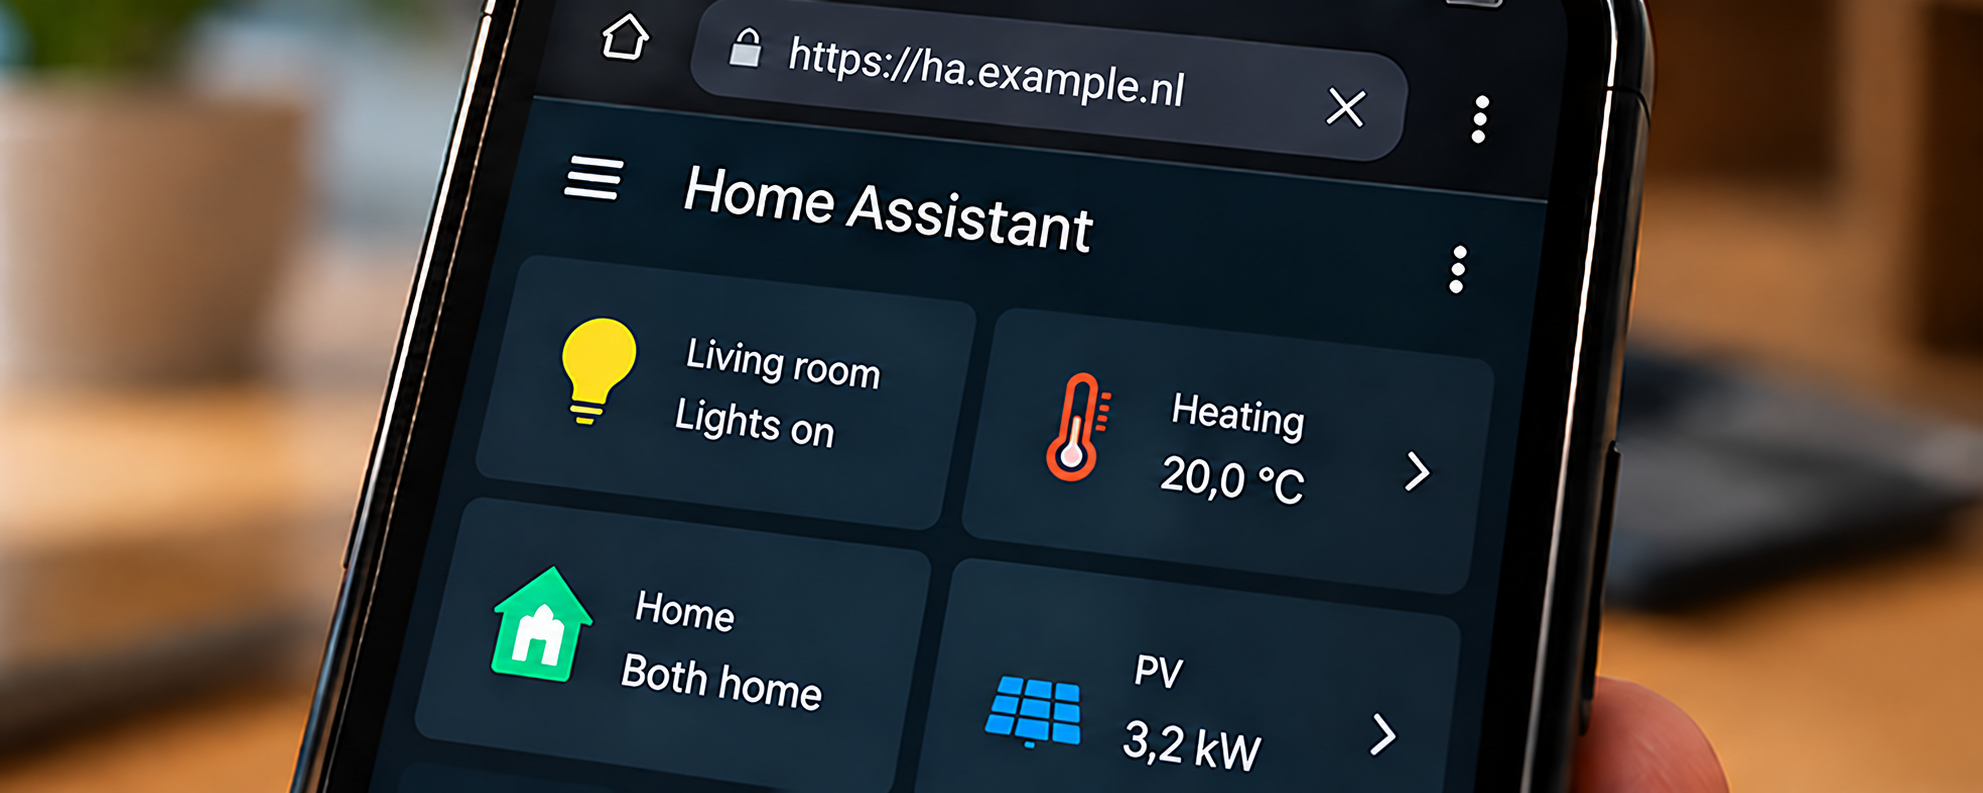
You open https://ha.example.nl on your phone. Cloudflare receives the HTTPS connection. Inside your home, a small program, cloudflared, maintains a secure tunnel connection to Cloudflare on its own initiative. The request reaches Home Assistant by that route. Your router therefore needs no incoming port forward for ports 80, 443, or 8123.
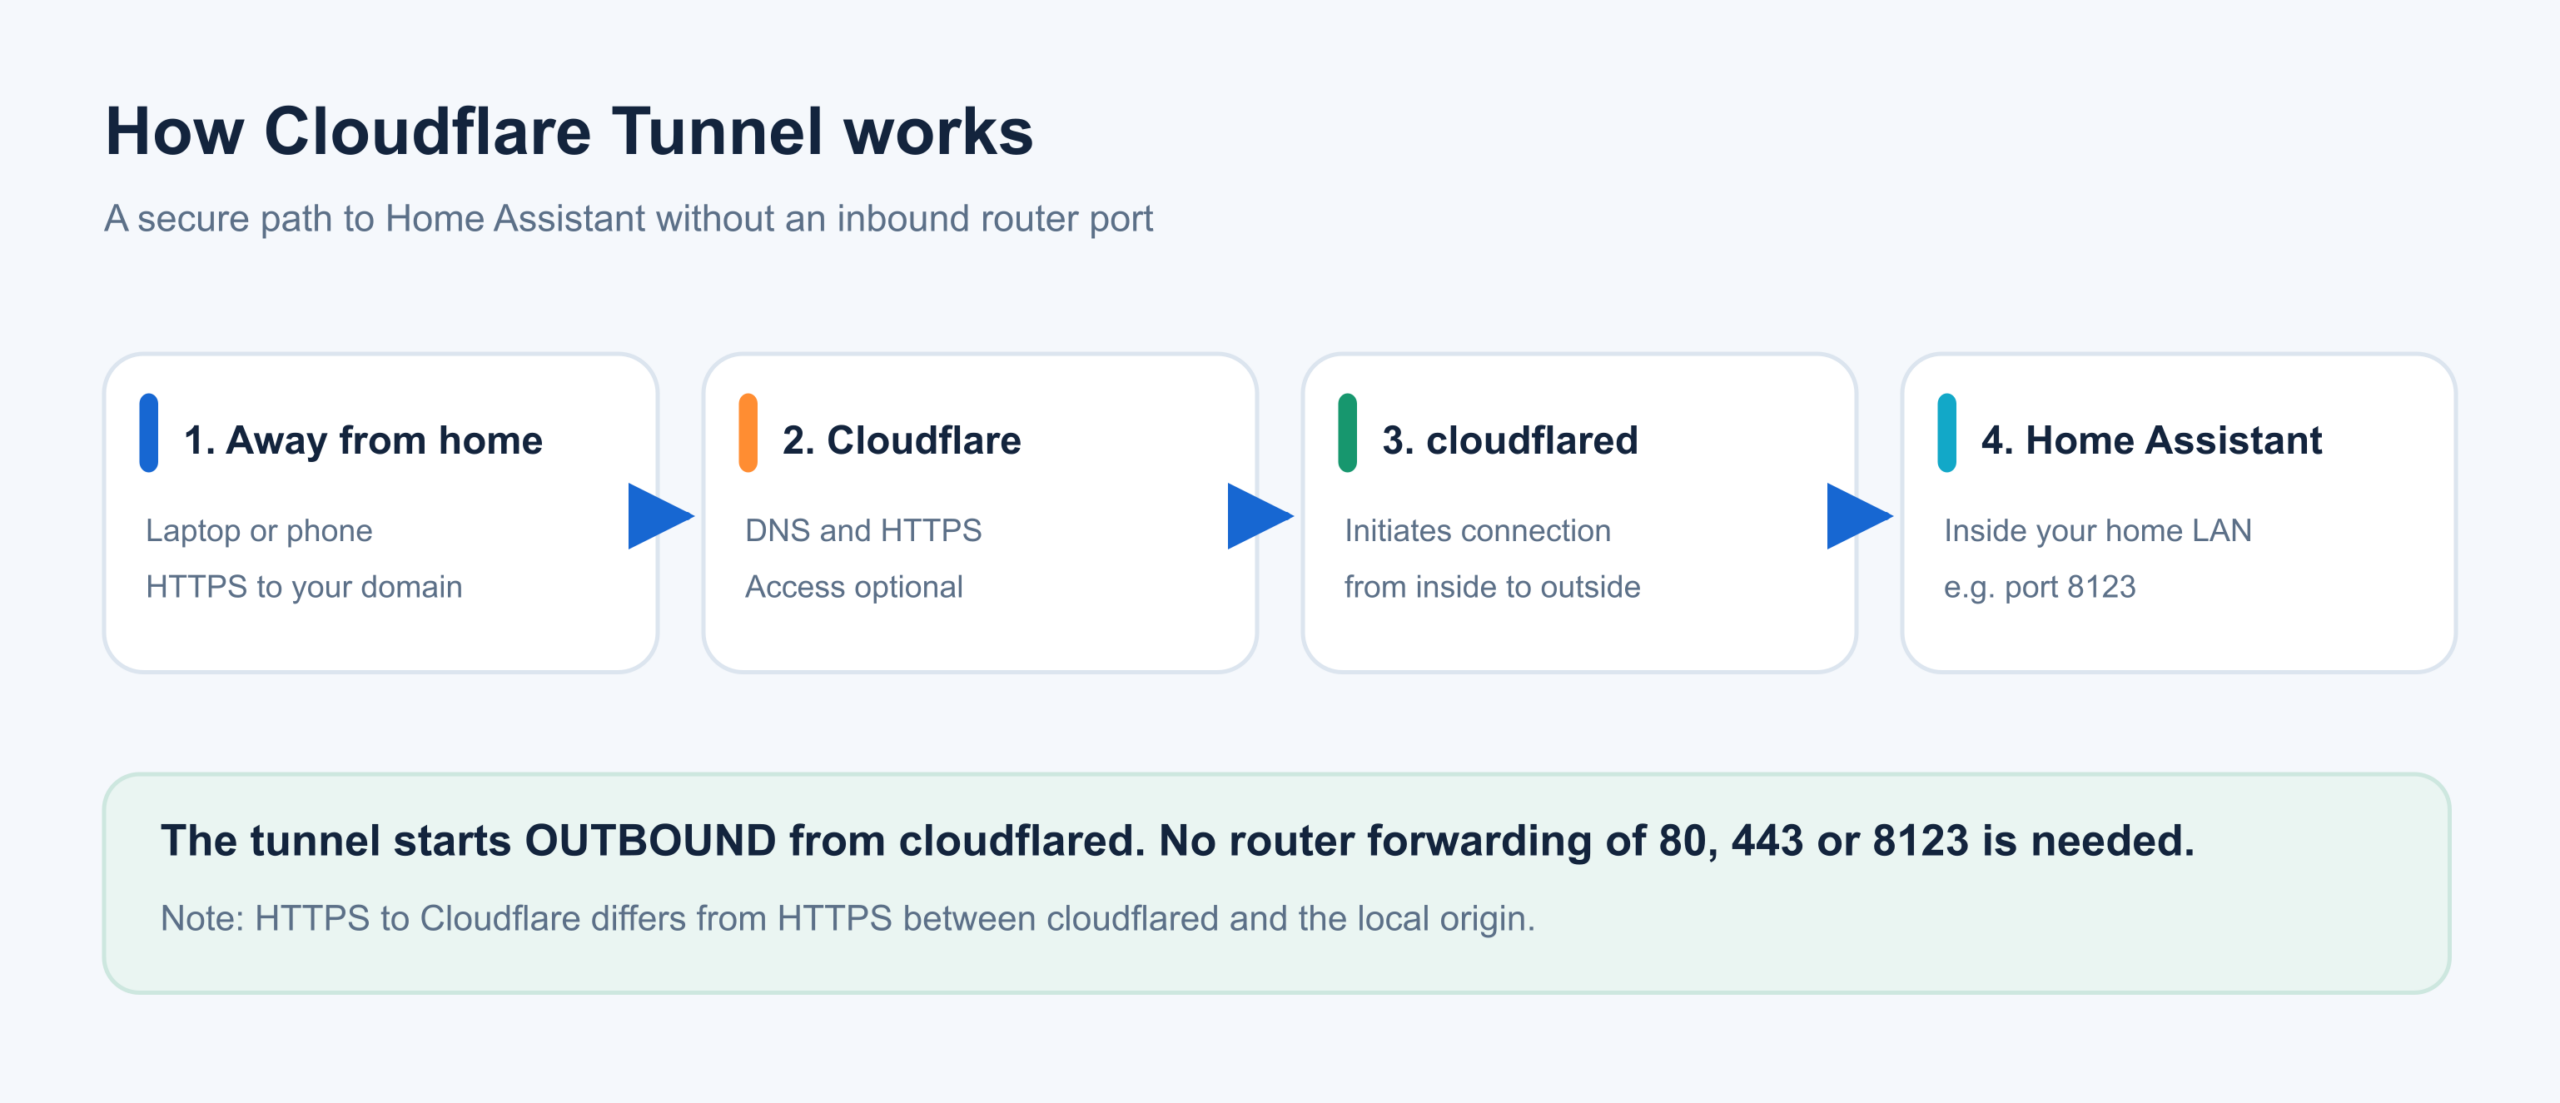
You can put an additional gate in front of it: Cloudflare Access, part of Zero Trust. Then only an approved identity can reach the Home Assistant sign-in page. Access is not always transparent to mobile apps, webhooks, and external integrations, though. We treat it as an optional advanced step rather than something to enable everywhere without testing.
Three terms that are often confused
Cloudflare Tunnel is the connection mechanism. cloudflared is the program that manages the tunnel and runs in your home. Cloudflare Access is an optional extra identity check for visitors. A custom domain is the readable address visitors use. Argo Tunnel is an older name for Cloudflare Tunnel; there is no second type of tunnel to choose.
1. What do you need?
- A working, updated Home Assistant installation, preferably Home Assistant OS if you are starting as a beginner.
- Your own domain, for example
example.nl, managed with Cloudflare DNS. A domain usually costs money; the required Tunnel features may be available within Cloudflare's current free offering. - A Cloudflare account and access to your domain's DNS settings.
- A device that can run
cloudflaredcontinuously: a Home Assistant community app, a Linux host, or a Docker host. - Access to your router to remove old port forwards and WAN management.
- An external test connection, such as a Windows laptop on a 4G/5G hotspot or an external server.
Make a backup first under Settings → System → Backups and keep a way to recover local management access. Also record which services are currently reachable through old port forwards. Do not remove those forwards until you have tested the new route.
First check your local Home Assistant port
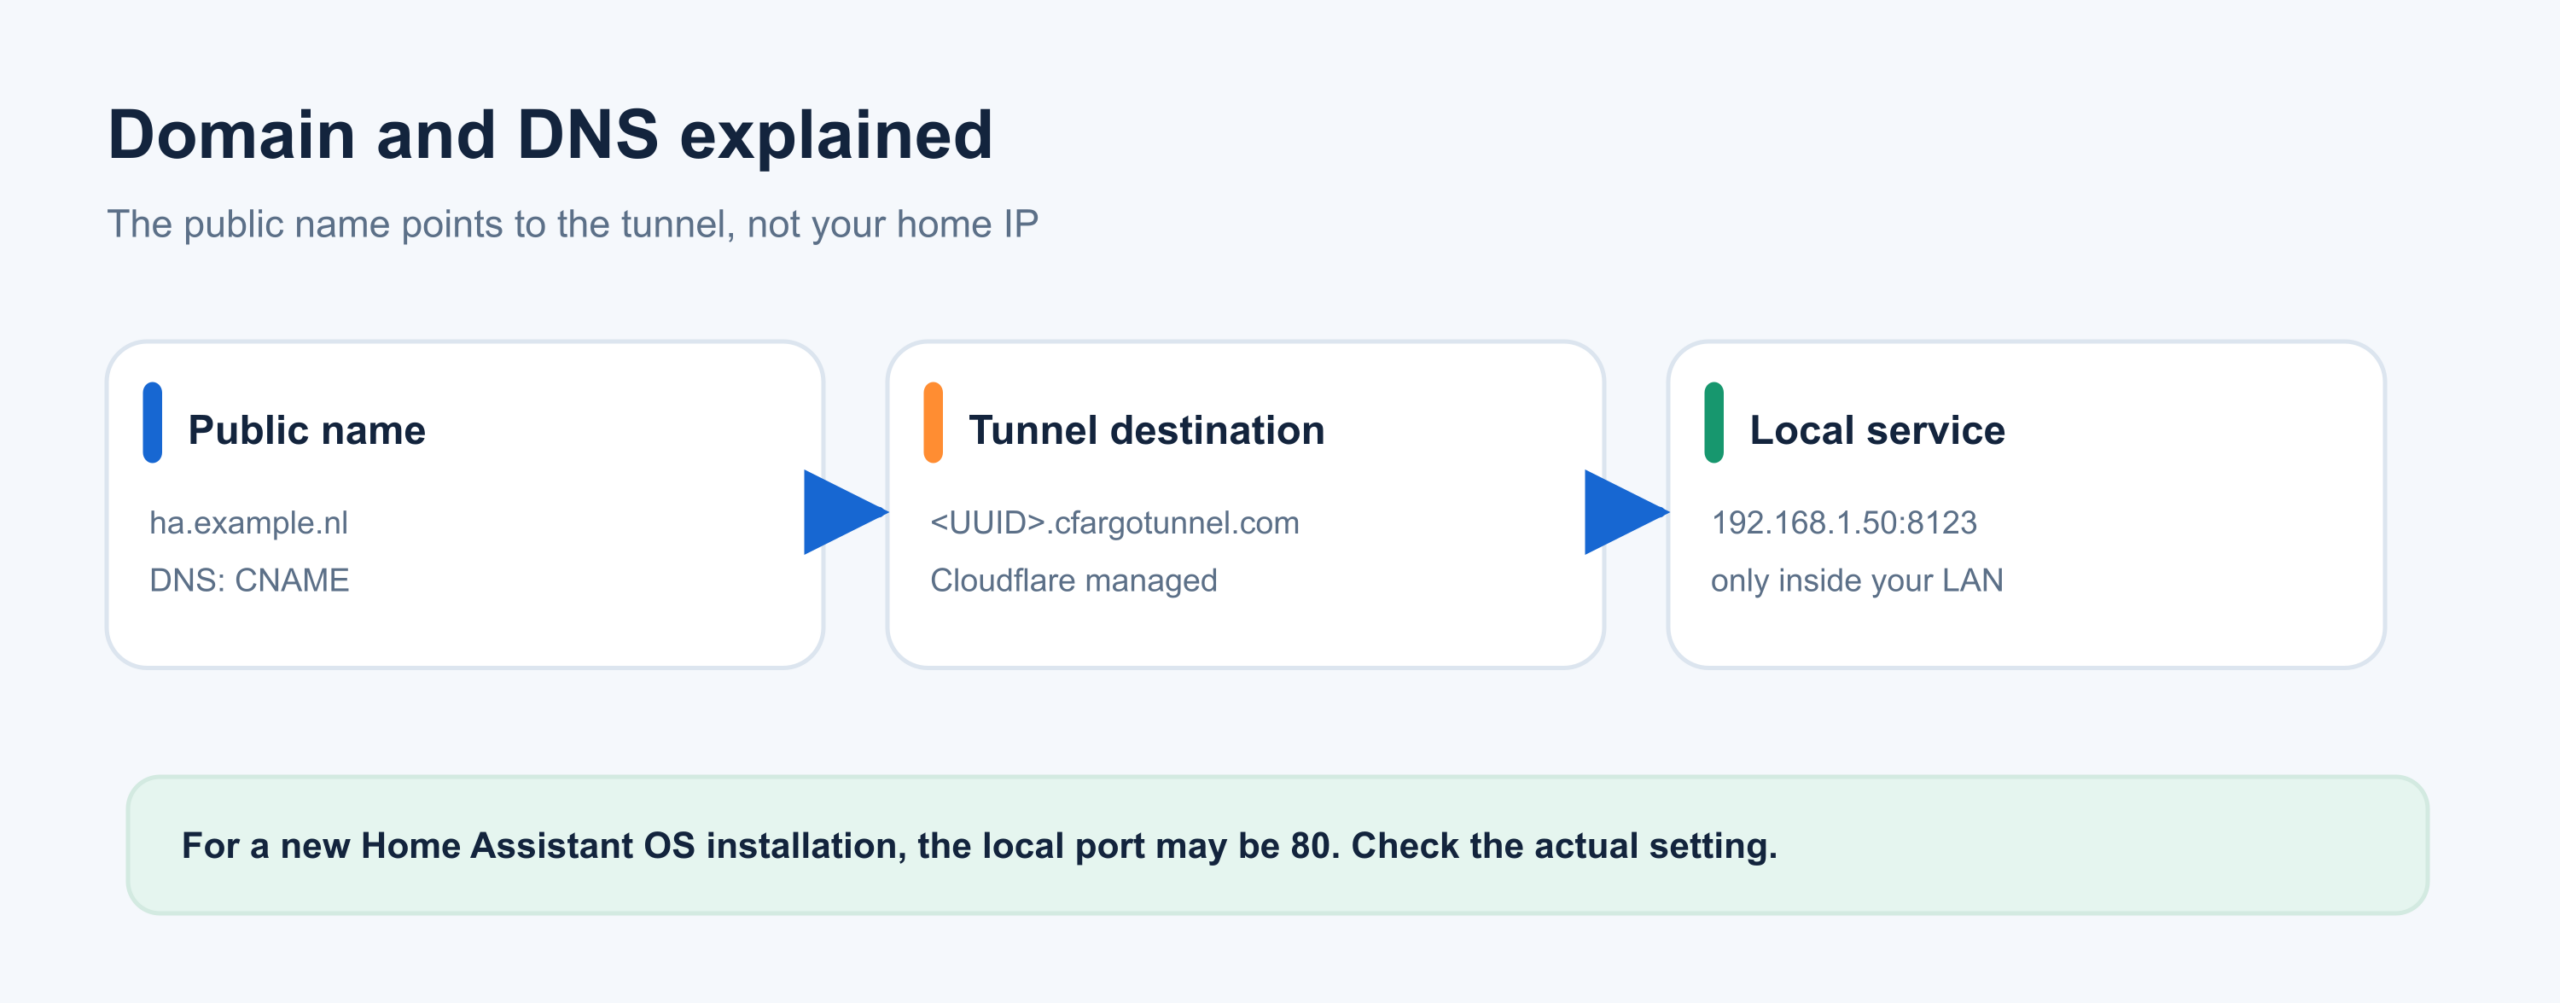
Many guides name 8123 as the default port, but this is no longer universal. Since Home Assistant 2026.8, new Home Assistant OS installations use port 80 by default. Existing HA OS installations keep their previous port, usually 8123; Home Assistant Container uses 8123 by default.
Open Settings → System → Network → HTTP server and check the server port. Our example uses:
| Component | Example |
|---|---|
| Home Assistant on the LAN | 192.168.1.50 |
| Home Assistant HTTP port | 8123 |
| External hostname | ha.example.nl |
cloudflared connector |
192.168.1.20 on a separate host, or a local HA app |
| Router LAN address | 192.168.1.1 |
These are fictitious examples. If your Home Assistant uses port 80, the local service URL is http://192.168.1.50:80.
2. Add your domain to Cloudflare
Open the Cloudflare dashboard, add your existing domain, and follow the activation steps. Usually you change the nameservers at your registrar to the two nameservers Cloudflare provides. Check existing DNS records before changing nameservers, especially if the domain also hosts a website and email. Copy existing MX, SPF, DKIM, and DMARC records correctly or you may inadvertently disrupt email.
Once activated, your domain appears in Cloudflare. We reserve a separate subdomain, ha, for Home Assistant. A separate subdomain prevents your existing website or another service from being overwritten. This is especially useful when migrating an older setup that already uses the same subdomain.
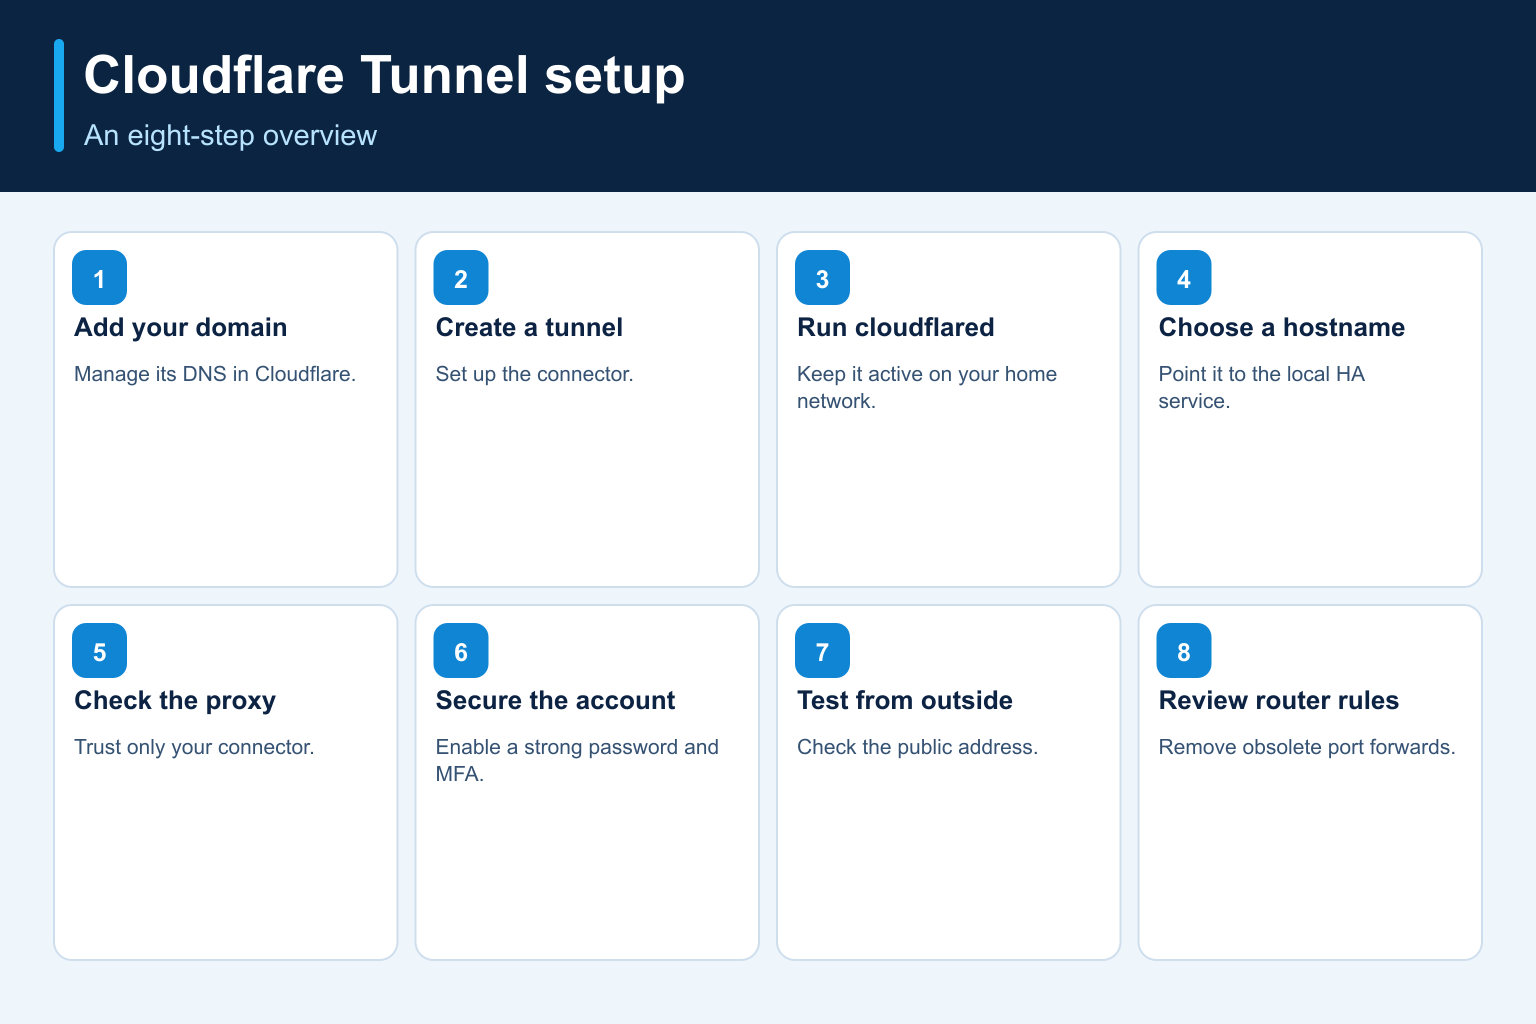
3. Create a tunnel in Cloudflare
- In the Cloudflare dashboard, open Networking → Tunnels; the navigation label may change after a dashboard update.
- Choose Create Tunnel and give it a recognizable name, such as
homeassistant. - Choose a remotely managed tunnel if you want to manage its configuration in the Cloudflare dashboard.
- Cloudflare shows installation options for Linux, Windows, and Docker. Choose how you will run
cloudflared. - Install the connector on your own device and confirm that the tunnel shows Healthy.
For a Docker host, Cloudflare gives a command in this form:
docker run cloudflare/cloudflared:latest tunnel \
  --no-autoupdate run --token <TUNNEL_TOKEN>
This is an example command. For a durable production setup, use a managed container with a restart policy and secure token storage. The installation command from your own dashboard contains your real token and is secret. Do not share it, put it on your website, or commit it to GitHub.
Home Assistant OS: a community app or separate connector?
Home Assistant OS is a managed system. You can run cloudflared through a community app (formerly add-on), for example a Cloudflared implementation from an external repository, or run cloudflared on a separate Linux/Docker machine. Exact installation steps and fields vary by community app and version. Consult the documentation for the particular app you choose. Home Assistant does not guarantee the quality or security of external repositories.
For beginners with an existing HA OS machine, such an app is practical. The most technically predictable route for a general guide is Cloudflare's documented, dashboard-managed tunnel with an official cloudflared connector. You can also use that route if Home Assistant runs on a NUC: cloudflared may run on another machine on the same network.
4. Publish your Home Assistant address
Open the tunnel you just created in Cloudflare and add a Published Application or Public Hostname. Use these values:
| Setting | Value |
|---|---|
| Subdomain | ha |
| Domain | example.nl |
| Type / Service | HTTP |
| Service URL | http://192.168.1.50:8123 |
Pay attention to the port: copy it exactly from your Home Assistant HTTP server settings. Use HTTP if Home Assistant offers only HTTP locally. Do not automatically choose HTTPS just because your external domain uses HTTPS; these are two separate connections.
The domain normally gets a DNS route to <TUNNEL-UUID>.cfargotunnel.com. When you publish the hostname in the Cloudflare dashboard, Cloudflare usually creates the corresponding DNS record. Do not needlessly add another A record pointing the same subdomain to your public IPv4 address.
Understanding HTTPS
The browser uses https://ha.example.nl and communicates with Cloudflare over an encrypted connection. From Cloudflare, traffic goes through the secured tunnel to cloudflared. From cloudflared to Home Assistant, the connection may use HTTP over your own LAN. That is not the same as TLS all the way to Home Assistant.
If the route between cloudflared and Home Assistant is not fully trusted, you can configure an HTTPS origin with a valid origin certificate. Verify the certificate chain and hostname, and use an originServerName and a trusted CA where needed. Do not leave noTLSVerify: true enabled permanently to bypass certificate errors. You do not need a separate Let's Encrypt certificate in Home Assistant solely for HTTPS between your browser and Cloudflare.
Cloudflare offers TLS settings for the public connection. Choose TLS 1.2 as a minimum and use TLS 1.3 where possible. Also check that WebSockets are allowed on Cloudflare; Home Assistant uses them for live updates.
5. Tell Home Assistant to trust the reverse proxy
A reverse proxy or tunnel connector delivers the user's connection to Home Assistant. Home Assistant needs to know which proxy it may trust when reading the real client IP from X-Forwarded-For. This is a security check: without the correct configuration, Home Assistant may block proxied requests.
In current Home Assistant versions from 2026.8 onward, configure this in the interface:
- Open Settings → System → Network.
- Find the HTTP server section.
- Enable Trust X-Forwarded-For.
- Under Trusted proxies, add the connector's actual IP address, or only the small container network actually in use.
For a separate connector at 192.168.1.20, trust that specific IP address. A community app may use a different Docker/Supervisor address. An example frequently found in older guides is 172.30.33.0/24, but it is not a universal value. Never automatically trust 0.0.0.0/0; that would let far too many senders supply forwarding headers.
Older articles show an http: section in configuration.yaml for this. It is useful when recognizing an existing configuration, but is no longer the recommended method for new Home Assistant versions. During an upgrade, older HTTP settings are usually migrated to the UI.
Set the external URL
Open Settings → System → Network → Home Assistant URL and enter this internet address:
https://ha.example.nl
Then check the Home Assistant Companion App on your phone. Where possible, use the internal LAN address while at home and the external address while away. Also test the app while the phone is actually using mobile data.
6. Secure your Home Assistant account
Even with a tunnel, the Home Assistant sign-in page is a real application that needs maintenance. Use a strong, unique password; enable multifactor authentication (MFA) in your Home Assistant user profile; update Home Assistant, the operating system, and the connector; and make regular backups. You may also consider blocking IP addresses after repeated failed sign-ins through the current HTTP server settings.
7. Optional: Cloudflare Zero Trust Access
Cloudflare Access adds a separate identity check before Home Assistant. In Zero Trust, create a self-hosted Access application matching ha.example.nl. Set an Allow policy that permits only your identity or a small group. You might use a supported identity provider or an email one-time passcode. An approved visitor then completes the Access check before the Home Assistant sign-in.
Why not apply Access to every client without testing?
Home Assistant uses API traffic, WebSockets, background requests, and sometimes webhooks. Cloudflare Access checks HTTP requests for a valid session or suitable token. The mobile Companion App and some external integrations may therefore behave differently from a normal browser. Test in advance: opening the app away from home, live status updates, notification actions, location updates, automatic background requests, and third-party integrations. Keep a recovery route in case you lock yourself out.
Cloudflare service tokens can protect machine-to-machine traffic, but require specific headers or suitable client integration. A device or webhook that cannot send such headers will not simply work behind an Access login. Do not make broad exceptions for /api/* or /auth/* without a security analysis; doing so may largely undo the extra protection.
A practical order is to get Cloudflare Tunnel + Home Assistant MFA working first, then add Access for browser use and assess each app or integration individually. If you want to keep the Home Assistant service entirely private, a VPN is often the better architecture.
8. Clean up old router settings
Once the tunnel works reliably, remove unnecessary port forwards to Home Assistant. Check TCP 80, 443, and 8123, among others. Exact port numbers may differ if you previously used another external port. Disable external router management (Remote WebGUI / Remote Management) where possible. Also check remote SSH and Telnet, Port Triggering, DMZ, and UPnP/NAT-PMP for mappings created automatically.
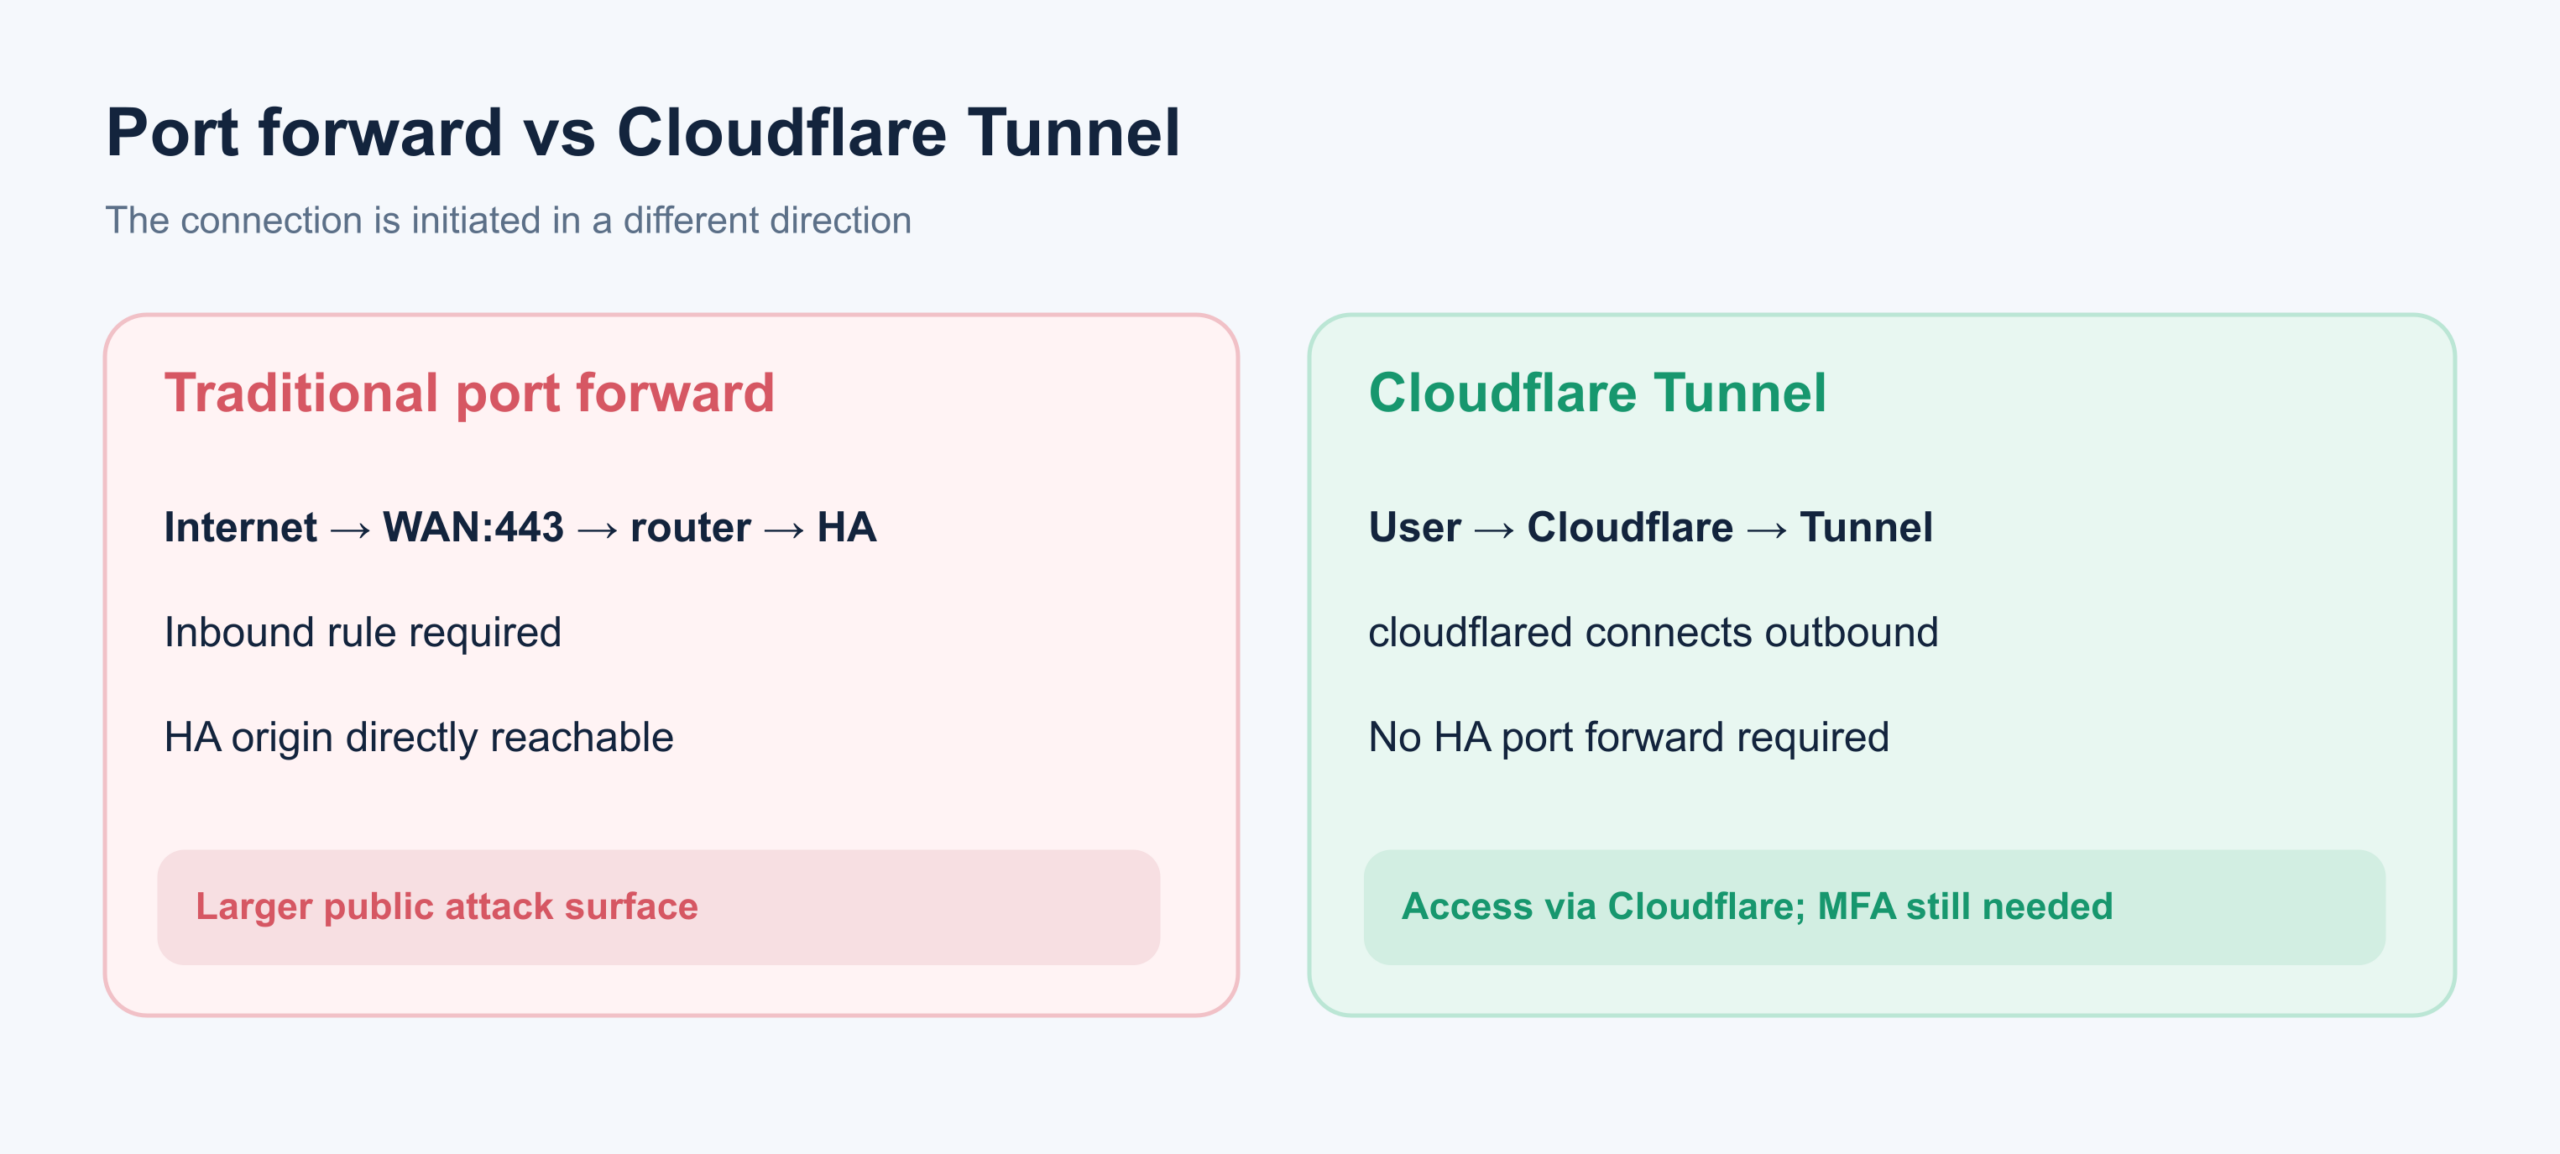
Note: removing a port forward does not automatically mean the router itself is not listening on the WAN side. Router management is a separate issue. Your provider may also have placed a modem or router in front of your own device. If your router's WAN IP is, for instance, 192.168.x.x or 100.64.x.x, you may have double NAT or CGNAT.
An important practical lesson: the port still seemed open
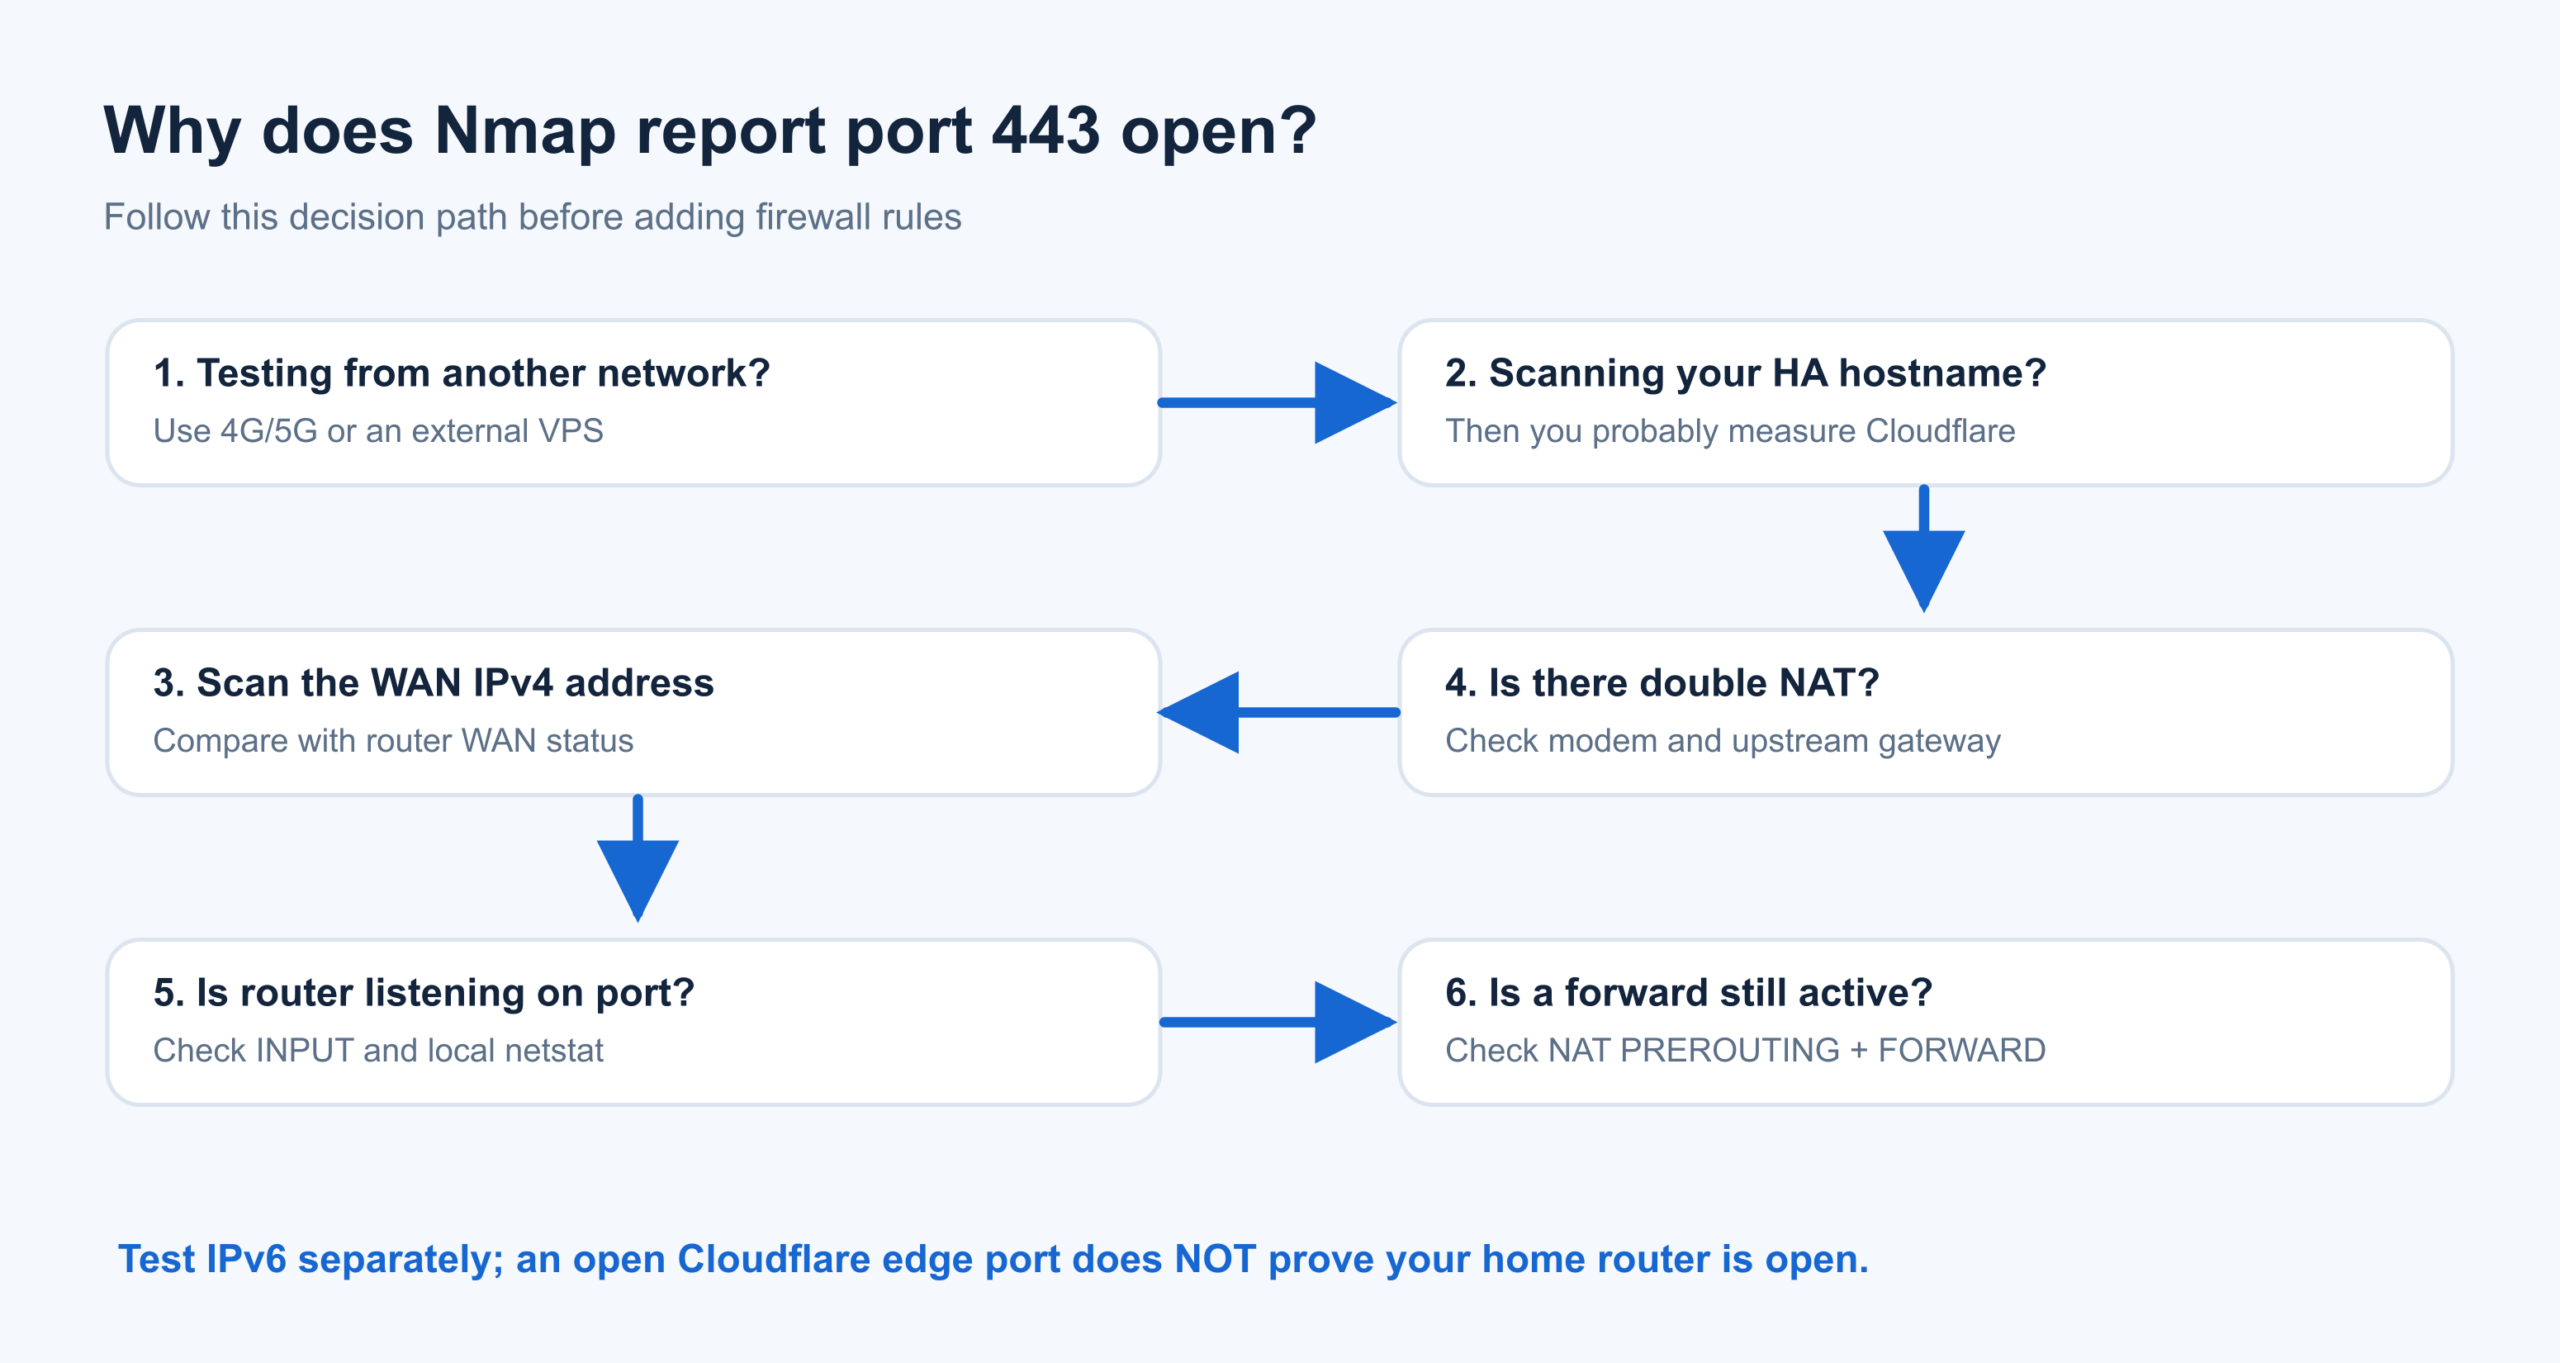
During testing of a DD-WRT router, port 443 seemed to remain open despite several iptables rules. There are several possible causes: the wrong WAN interface, a port forward taking another chain, WAN web management on the router itself, an upstream modem, IPv6, or a scan from the local network distorted by NAT loopback / hairpinning. Scanning ha.example.nl normally measures the Cloudflare edge, not your home router.
On Linux router firewalls, three components matter:
| Netfilter component | Traffic |
|---|---|
INPUT |
Destined for the router itself, such as its web interface |
FORWARD |
Sent through the router to another device |
nat PREROUTING |
Can first change an incoming port forward with DNAT |
A DROP for TCP 443 in INPUT therefore does not automatically block a forward from WAN:443 → Home Assistant:8123. After DNAT, the FORWARD chain may see port 8123 as the destination. Removing the port forward at its source is better than blindly stacking firewall rules.
Never use router firewall commands without knowing your WAN interface. General INPUT -p tcp --dport 443 -j DROP rules without -i <WAN-interface> may also block local router administration; the same applies separately to ip6tables. A DROP often appears as filtered in Nmap; with an explicit REJECT, the result may be closed. Both may block the intended path, but the scan statuses differ.
Read-only diagnostics for DD-WRT
Connect to your own router using SSH over the LAN. To inspect the current WAN interface and firewall rules:
get_wanface
ip addr
ip route
ip -6 route
iptables -vnL INPUT --line-numbers
iptables -vnL FORWARD --line-numbers
iptables -t nat -vnL PREROUTING --line-numbers
ip6tables -vnL INPUT --line-numbers
ip6tables -vnL FORWARD --line-numbers
netstat -lntp
Not every DD-WRT build includes all these tools and options. netstat shows which process is listening locally but does not prove that it can be reached from the internet. Do not simply stop httpd or other management processes: you could disable your own local administration. First diagnose the route with a real external test and counters on the relevant firewall rules.
9. Testing: is it really closed?
The correct check consists of two separate tests:
A. The application through Cloudflare. You want https://ha.example.nl to be reachable and Home Assistant to work properly.
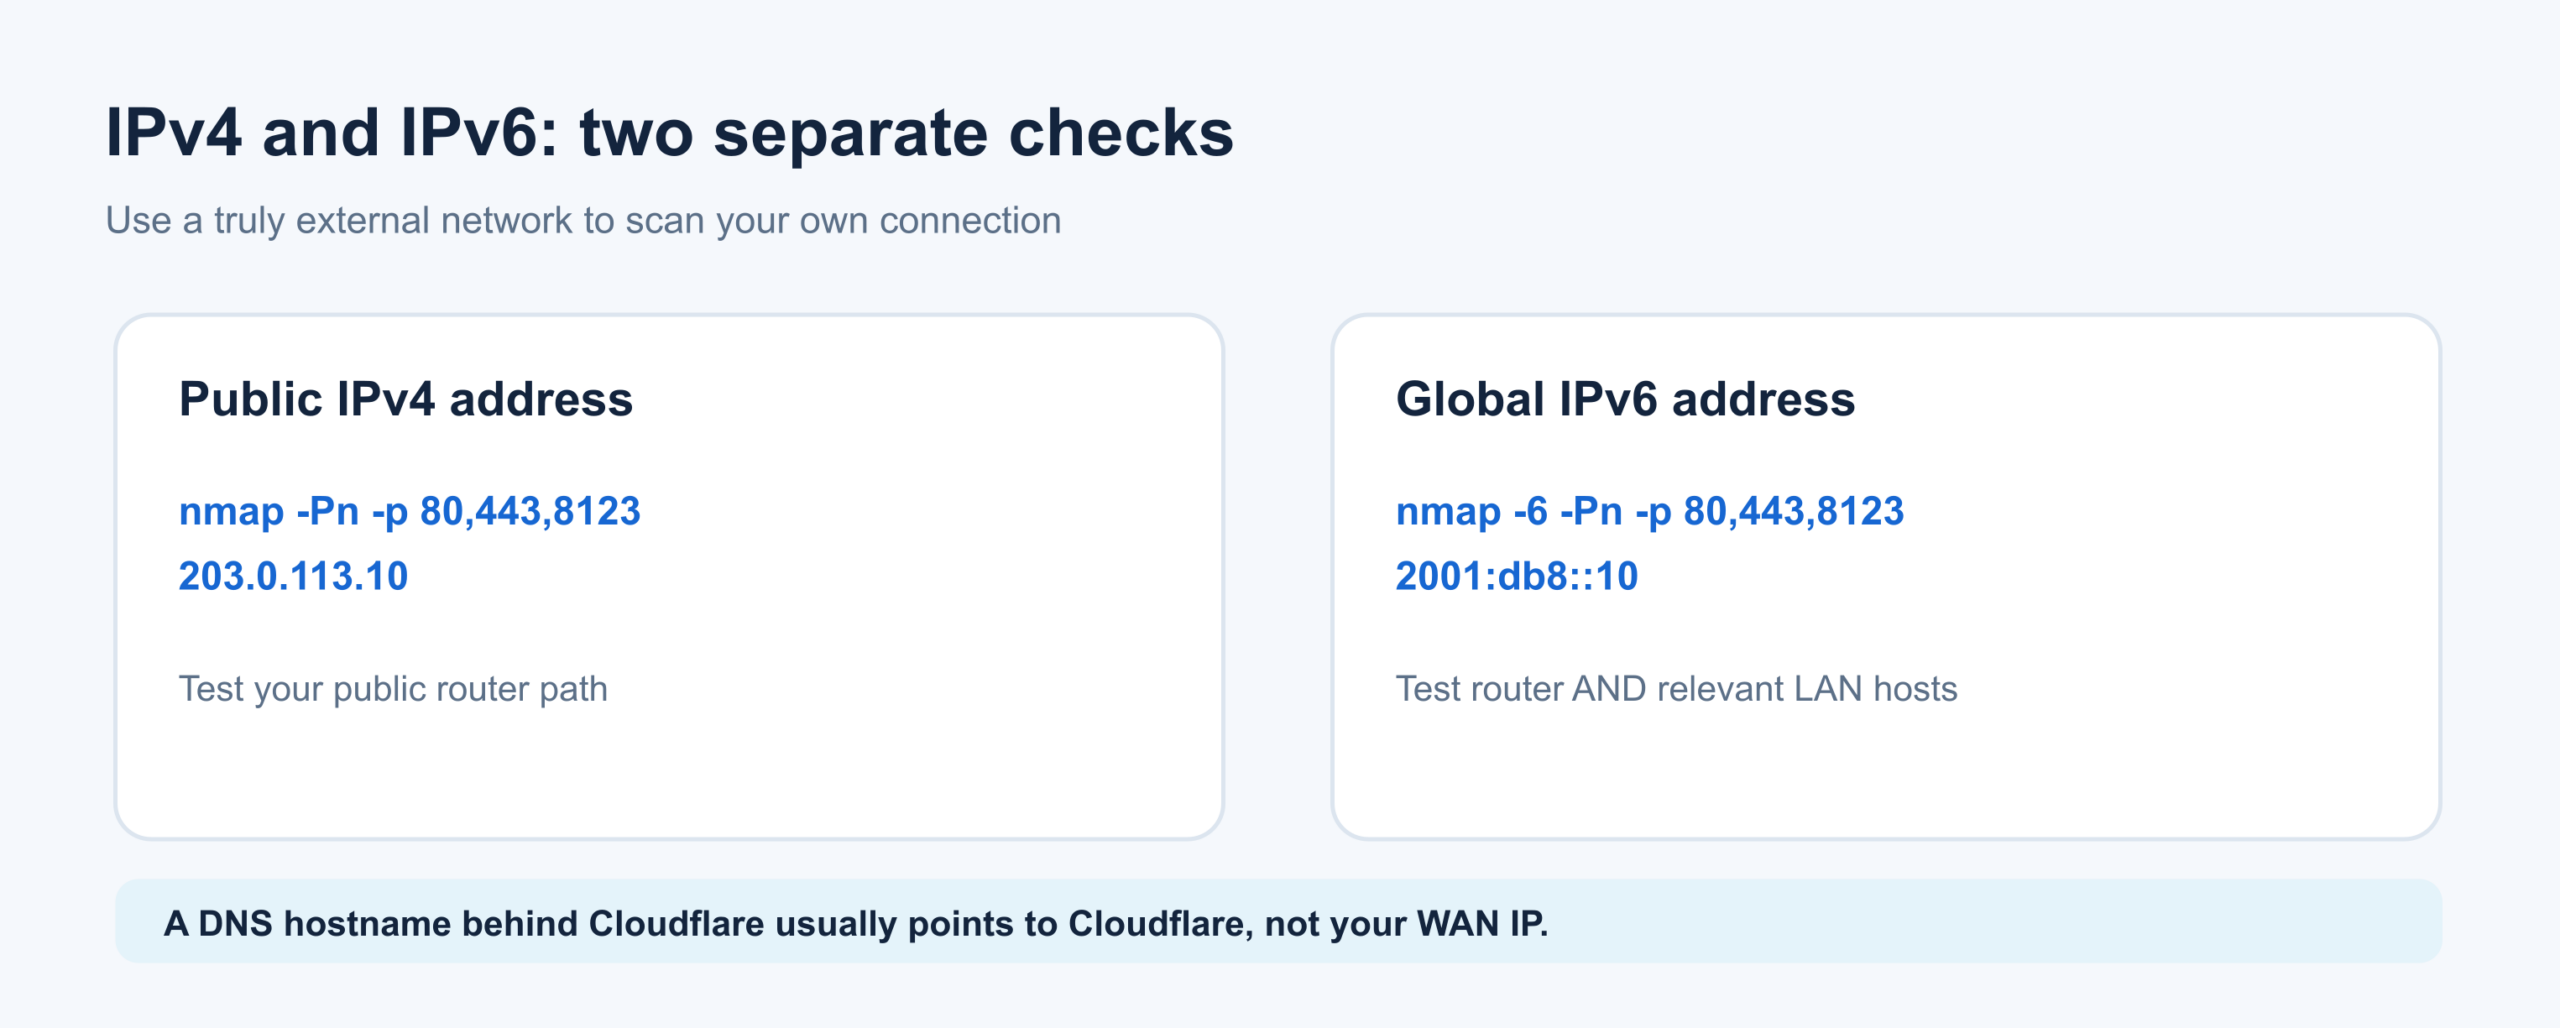
B. Your public home IP directly. You do not want Home Assistant ports or router management to be unintentionally exposed. Use your actual public WAN IP for this test, not ha.example.nl.
Windows: using Nmap
Install Nmap and open PowerShell. Scan only your own address or a system you have permission to test.
nmap -Pn -p 22,53,80,443,8123 203.0.113.10
nmap -Pn -sV --reason -p 22,80,443,8123 203.0.113.10
nmap -6 -Pn -p 22,80,443,8123 2001:db8::10
Replace the documentation addresses with your actual public addresses. On a Windows machine without Nmap, you can test one TCP port:
Test-NetConnection -ComputerName 203.0.113.10 -Port 443
open means something accepts connections on the tested path. closed usually means the target responds but no service listens on that port. filtered means Nmap cannot determine reliably whether there is a listener, often because of filtering. Port status alone does not identify the responsible device or process.
The test really must originate outside
For example, connect your Windows laptop to your phone's mobile hotspot. Switch off Wi-Fi on the phone so the hotspot uses mobile data. Then scan your home's public IP. A scan from a PC on the same home network may behave differently due to router NAT loopback and is not conclusive proof of external reachability.
If Nmap still reports 443/tcp open, check: are you accidentally scanning Cloudflare? Which WAN IP does your router show? Is there an ISP modem in front? Is IPv6 handled separately? Do INPUT/FORWARD drop counters rise during an external test? If a rule remains at zero hits, the packet may take another route or interface.
10. Common problems
| Problem | Likely cause | Targeted check |
|---|---|---|
Tunnel shows Down |
cloudflared has stopped or outbound traffic is blocked |
Check logs and outbound TCP/UDP 7844 |
| Hostname gives error 1033 | DNS route or tunnel unavailable | Check tunnel status, published subdomain, and DNS |
| 502 / origin unreachable | Wrong local URL, port, or network route | Test http://192.168.1.50:<port> from the connector |
| Home Assistant shows 400 / proxy error | Wrong trusted proxy | Check actual source IP of cloudflared and HA HTTP server |
| Site loads, live updates do not | WebSockets or proxy rules | Check Cloudflare WebSockets and caching rules |
| App works in browser but not on mobile | Access session, app, or background traffic | Test away from Wi-Fi, possibly without Access |
| HTTPS origin reports certificate error | Certificate name or CA is wrong | Check TLS validation; do not disable it permanently |
| Nmap reports 443 open | Cloudflare edge, WAN management, NAT, or IPv6 | External scan of actual WAN IP, router counters, and modem route |
| Shodan shows an old banner | Historical scan results | Run a current external test; Shodan is not live |
| Works only at home | DNS, tunnel, route, app URL, or Access | Check external URL and DNS resolution |
Cloudflare Tunnel usually needs outbound TCP and/or UDP 7844. A normal outbound HTTP connection from your browser uses 443, but that does not mean the router must forward incoming 443 to Home Assistant.
11. Alternatives: when should you choose something else?
| Method | When suitable? | Important consideration |
|---|---|---|
| Cloudflare Tunnel | Easy access through your own HTTPS name without an HA port forward | Depends on Cloudflare; account and app security still needed |
| Cloudflare Tunnel + Access | Primarily browser use and controlled identities | Test apps, APIs, and webhooks separately |
| VPN / WireGuard / Tailscale | Keep Home Assistant private only | A VPN client is needed on your devices |
| Home Assistant Cloud | Minimal technical administration | Subscription, but direct HA integration |
| DuckDNS + Let's Encrypt + forward | Older or specific setup | DNS and TLS do not remove direct internet exposure |
For many beginners, Home Assistant Cloud is the simplest alternative. People who value complete network privacy over a public domain often choose a VPN/Tailscale. Cloudflare Tunnel is useful if you want your own domain without directly exposing HA ports.
12. Final checks before you finish
Check at least the following:
- Home Assistant is updated, and a strong password and MFA are enabled.
- A Home Assistant backup and a safe recovery route are available.
- Cloudflare Tunnel is healthy, and its token is not stored publicly.
-
ha.example.nlpoints to the tunnel, not your public home IP. - The service URL and port match your actual Home Assistant installation.
- Trusted proxies are limited to the actual connector, never
0.0.0.0/0. - The external Home Assistant URL uses HTTPS.
- The Companion App and WebSockets work outside your Wi-Fi.
- Old router port forwards to Home Assistant have been removed.
- External WAN web management, unnecessary SSH/Telnet, DMZ, and UPnP mappings have been checked.
- IPv4 and IPv6 have been tested from a genuinely external connection.
- Cloudflare Access was enabled only after practical tests of clients and integrations.
Conclusion
Cloudflare Tunnel makes remote Home Assistant access more straightforward: you need not open an incoming web port to your own Home Assistant server. This improves the network design, but does not guarantee that your entire home network is secure. The essentials remain: do not expose router management publicly, remove old port forwards, update Home Assistant, use MFA, and check both IPv4 and IPv6 from a genuinely external network.
Sources and further reading
- Home Assistant: Remote access — official explanation of remote access, current ports, and reverse proxies.
- Home Assistant: HTTP integration — HTTP server settings, trusted proxies, IP bans, and caching.
- Home Assistant 2026.8 — change to the default port for new HA OS installations and move to the UI.
- Home Assistant: MFA — a second authentication factor.
- Cloudflare: Cloudflare Tunnel and installation — official tunnel explanation and current dashboard workflow.
- Cloudflare: Tunnel with firewall — outbound access on 7844 and limiting inbound access.
- Cloudflare: Access self-hosted application — policies and identity gate.
- Cloudflare: Origin parameters — HTTPS origin and certificate checks.
- Nmap: Port scanning basics —
open,closed, andfiltered. - Linux iptables manual — the difference between INPUT, FORWARD, and NAT.
- Let's Encrypt: challenge types — HTTP-01 versus DNS-01.
- Nicolas Fränkel: Cloudflare Tunnel for Home Assistant — experience migrating an existing port-forward/Let's Encrypt setup (2025).
- Chris Arcand: Zero Trust — Securely Accessing Home Assistant with Cloudflare Tunnels — practical experience with Tunnel and MFA (2025).
Information checked on 28 October 2026. Dashboard labels, integrations, and licensing terms may change after publication. All photographs are editorial AI images; the technical diagrams were drawn for this article and are not actual screenshots of Cloudflare or Home Assistant.