
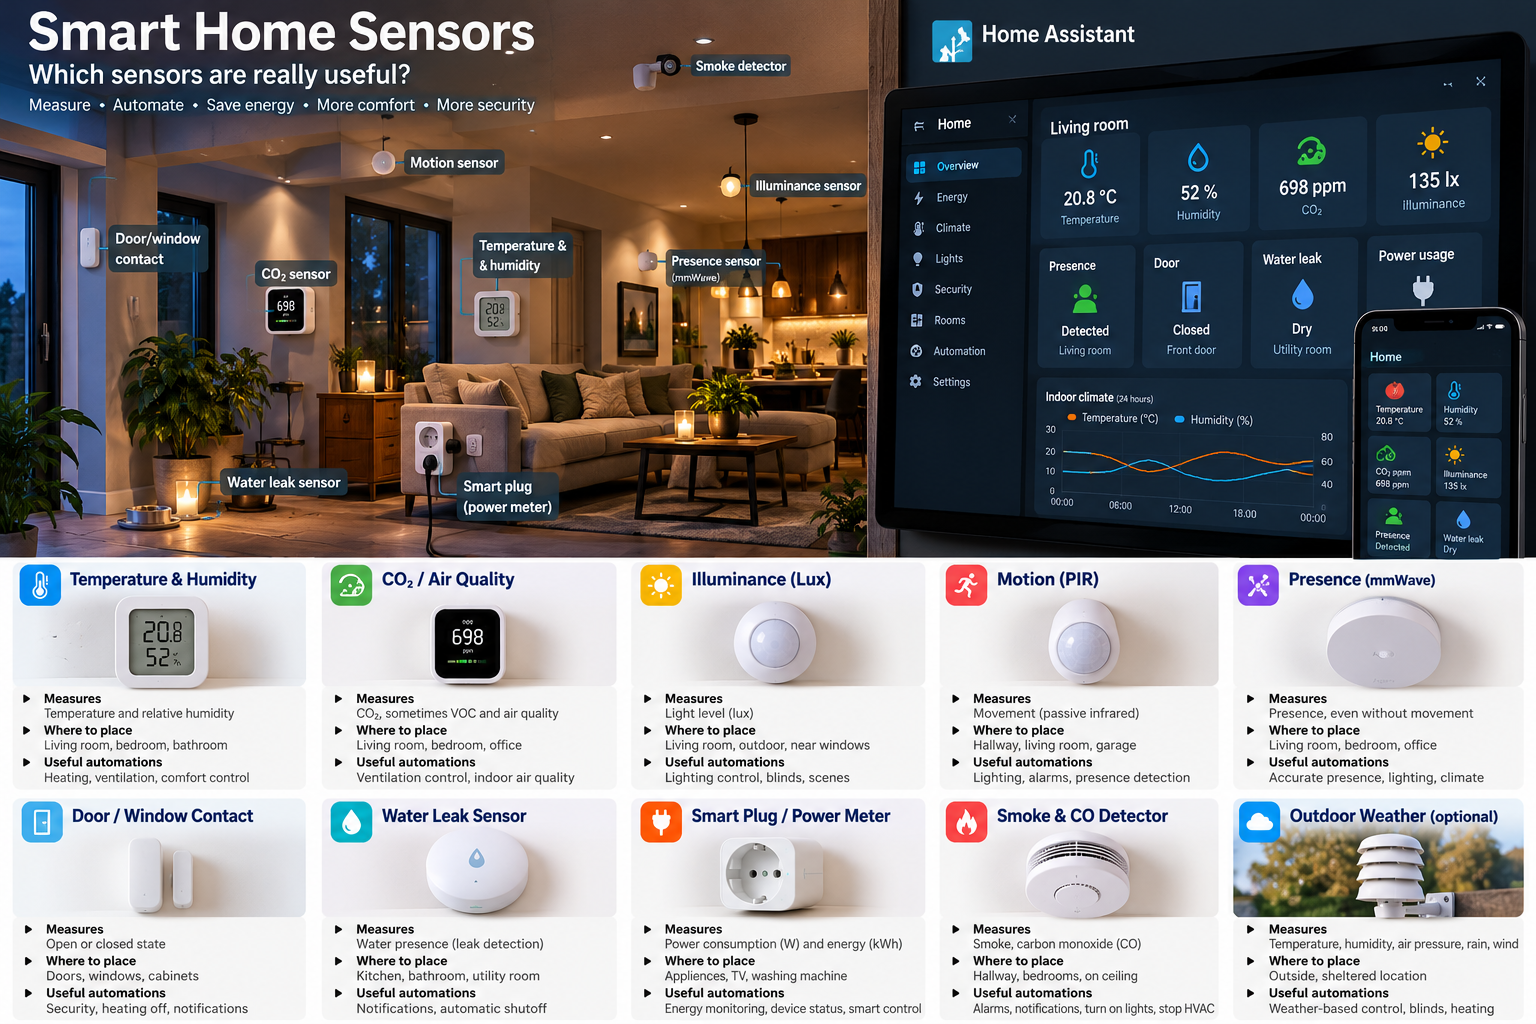
An extensive guide for a smart home: what sensors measure, where to place them, which automations they enable, and which ones you do not need everywhere.
The core of this article. A smart home does not become smart by buying many sensors. It becomes smart when you measure the right information in the right place and use it for comfort, safety, energy and reliable automation.
Start with the purpose
1. First things first: measure only what you will use
Sensors are the senses of a smart home. They tell Home Assistant what is happening: how warm it is, whether someone is present, how much daylight enters, whether a window is open, whether a device uses power, or whether water is on the floor.
More sensors do not automatically mean better automation, however. A sensor is useful only if its measurement leads to insight, a better decision or a concrete action. Before every purchase, ask: which decision do I want to make with this measurement?
- Measure temperature to control heating or cooling.
- Measure humidity to detect showering and control ventilation.
- Measure CO₂ to decide whether more ventilation is needed.
- Measure lux to turn lights on only when it is actually dark.
- Measure presence so a room is not heated or lit unnecessarily.
- Measure power to recognise when a washing machine has finished.
Design rule. A sensor without an application is mainly extra data. A sensor with a clear purpose becomes a building block for automation.
2. Sensors that add value to almost every smart home
There are dozens of sensor types, but a small group provides most of the value in most homes. This guide covers both the real essentials and more specialised options.
My practical core set is temperature and humidity, door/window contacts, motion or presence sensors, water-leak sensors and energy measurement. CO₂/air quality and lux are then very strong additions. Smoke and CO detection are matters of safety, but Home Assistant must play only a supplementary role there.
What is each measurement useful for?
3. Temperature sensor: simple but fundamental
Temperature is one of the most useful smart-home measurements. That is not because you necessarily want a number for every room on a dashboard, but because temperature directly affects heating, cooling, ventilation and comfort.
Where is temperature genuinely useful?
- Living room: main control and comfort.
- Bedroom: night-time comfort and ventilation strategy.
- Attic: recognising overheating in summer.
- Bathroom: especially together with humidity.
- Utility room: monitoring frost, a boiler, network equipment or equipment temperature.
Do not put a temperature sensor above a radiator, in direct sun, next to a window or directly in the ventilation airflow. You want room temperature, not a local heat or cold source.
You do not need one everywhere. If several rooms behave similarly thermally and you do not control them separately, one well-placed sensor is often more valuable than five arbitrary ones.
4. Humidity: especially useful for bathrooms, ventilation and comfort
Relative humidity is useful, but context matters. The same relative humidity at different temperatures does not mean exactly the same moisture content. For simple bathroom automations, relative humidity is often fine; for advanced ventilation control, absolute humidity can be more interesting.
Good applications include:
- Detecting a shower from a rapid rise.
- Temporarily increasing ventilation.
- Signalling humidity that remains too high for a long time.
- Recognising dry winter air.
- Assessing comfort and condensation risk together with temperature.
For a bathroom, the trend is often more important than one fixed limit. A rise of, for example, 8–15 percentage points over a short period can indicate showering more reliably than an absolute limit that behaves differently in summer and winter.
5. CO₂: one of the best sensors for demand-controlled ventilation
CO₂ is particularly interesting as an indicator of occupancy and ventilation demand. People produce CO₂ through breathing; the concentration rises in an occupied room when insufficient fresh air is supplied.
Use CO₂, for example, to:
- Increase ventilation automatically when a room is busy.
- Control bedroom ventilation during the night.
- Regulate a home office or living room according to air quality.
- Warn when ventilation seems structurally insufficient.
Do not treat CO₂ as one magical health number. Use it primarily as a practical ventilation indicator and examine trends, duration and context. A short spike differs from a high level lasting hours.
A strong combination. CO₂ + presence + window state provides much more information than CO₂ alone. You can, for example, ventilate when the room is occupied and the window remains closed.
6. VOC, PM2.5 and “air quality”: useful, but understand the measurement
People often speak of air quality as if it were one measurement. In reality, sensors can measure or estimate very different substances.
- VOC: volatile organic compounds, for example from cooking, cleaning products, paint or furniture.
- PM2.5 / PM10: fine particles, relevant to cooking, wood smoke or outdoor air pollution.
- AQI: a combined index whose meaning depends on its source or manufacturer.
- CO₂ equivalent: an estimate based on other gases in some sensors; not the same as a real NDIR CO₂ measurement.
For serious ventilation control, I would prioritise real CO₂ measurement. VOC and particles are excellent additional signals, especially in a kitchen, living room or home near busy traffic.
7. Motion sensor (PIR): inexpensive, fast and still very useful
A PIR sensor detects changes in infrared radiation and is excellent at detecting motion. For lighting, hallways, toilets, utility rooms and security, PIR often remains the best value.
Strengths include:
- Low energy use and therefore long battery life.
- Fast response.
- Low cost and broad availability.
- Reliable detection of motion and walking routes.
Its weakness is exactly what the name suggests: motion. Someone sitting still on a sofa or working at a desk may eventually no longer be detected. PIR is therefore not the same as genuine presence.
8. mmWave presence: when a person sitting still must remain present
mmWave radar can detect small movements and is therefore better suited to actual room occupancy. Think of someone reading, watching TV, sleeping or working at a computer.
Ideal rooms include:
- Living room.
- Home office.
- Bedroom, if carefully configured.
- Rooms where lighting or climate control must not switch off when someone sits still.
mmWave also has disadvantages: sensitivity may be too high, detection can pass through thin materials, and some sensors notice curtains, fans or pets. Configuring zones and sensitivity is therefore important.
For many rooms, PIR + mmWave is ideal: PIR for rapid motion, mmWave to retain presence.
9. Door and window contacts: perhaps the most underrated sensors
A contact sensor reports only two states: open or closed. Yet it is among the most useful signals in a smart home because it adds immediate context.
- Pause heating when a window stays open for a long time.
- Arm Alarmo and check open entry points.
- Notify when a garage or exterior door remains open too long.
- Combine the front door and presence to recognise arrival more reliably.
- Control ventilation differently when windows are open.
Home Assistant generally treats these entities as binary sensors. The device class then determines whether the interface shows, for example, “Open/Closed”, “Motion/Detected” or another interpretation. Good device classes matter for dashboards and automations.
10. Light sensor (lux): essential for lighting that does not switch on blindly
Time and sunset are useful, but do not tell you how much light is actually in a room. A lux sensor does.
Examples:
- Switch hallway lights on only when there is motion and lux is below a chosen value.
- Close blinds when direct sun and high light intensity occur together.
- Avoid switching lights on during the day when daylight is sufficient.
- Use light level as context for scenes.
Place a lux sensor where it measures general ambient light. Directly opposite a lamp or in direct sunlight, it will show large peaks that do not represent the whole room.
11. Water-leak sensor: cheap, simple and potentially enormously valuable
Water-leak sensors rarely do anything – and that is exactly the point. But when a hose, siphon, boiler or dishwasher leaks, an early alarm can prevent considerable damage.
Place them especially near:
- Washing machine.
- Dishwasher.
- Sink and kitchen plinth.
- Boiler or heat pump.
- Meter cupboard or utility room if water pipes run there.
- Basement, utility room or places with previous leaks.
The best automation is usually simple: notify immediately, optionally switch off relevant devices and – if your installation safely supports it – operate an automatic shut-off valve.
Avoid unnecessary complexity. For leaks, you do not want complicated sensor fusion. One reliable “water detected” signal should escalate as directly as possible.
12. Energy and power sensors: from insight to device status
Measuring energy is much more than drawing a graph. Current power in watts can help recognise whether a device is active, on standby or finished.
- Washing machine and dryer: recognise
running/finished. - 3D printer: infer print status from power.
- TV/AV: reveal standby consumption.
- Boiler or heating: track actual switching behaviour.
- Computer or server: measure active use and peaks.
Home Assistant can include individual devices as energy meters in the Energy dashboard. If you have only power in watts, an integration/Riemann-sum helper can derive energy in kWh.
Watch the electrical load: not every smart plug is suitable for heavy or inductive loads. The electrical rating matters more than the software.
13. Smoke, heat and CO detectors: safety first, automation second
Smoke and carbon-monoxide detectors must primarily be reliable, purpose-built safety devices. Home Assistant can add notifications, lighting scenes and logs, but it must not become the only safety layer.
- Send a push notification when a linked detector alarms.
- Turn lights on along an escape route.
- Activate extra sirens or speakers as a supplementary warning.
- Monitor status and battery.
Use connected smart-home functions as an extra layer. The detector’s core function must work independently, even when Home Assistant, Wi‑Fi or internet is unavailable.
14. Outdoor and weather sensors: when local data really helps
An outdoor temperature sensor can be surprisingly valuable for heating, cooling, blinds and ventilation. For more extensive weather logic, you can also measure air pressure, precipitation, wind and outdoor humidity.
Typical uses include:
- Close blinds only with sufficient sun and high outdoor temperature.
- Control windows/ventilation more intelligently from the indoor-outdoor difference.
- Skip irrigation when enough rain has fallen.
- Warn of frost for outdoor taps or pipes.
- Assess whether conditions favour heat-recovery-ventilation bypass or night cooling.
Location matters for weather data. An outdoor sensor against a sunlit south wall mainly measures the wall, not outdoor air. Protect it from direct sun and provide sufficient airflow around it.
15. Specialised sensors: useful when you have a specific purpose
Not every home needs every sensor. Typical specialised examples include:
- Differential pressure: relevant to ventilation, filters or airflow.
- Sound: baby’s room, machine noise or specific events.
- Vibration: doors, windows, appliances or tamper detection.
- Soil moisture: garden and plants.
- Water flow: leaks, consumption and appliance cycles.
- BLE proximity: presence or location within zones.
- Air pressure: weather trends or technical applications.
The question remains: which decision improves because of this sensor? If you cannot answer clearly, it probably is not your next purchase.
Choose, combine and place sensors
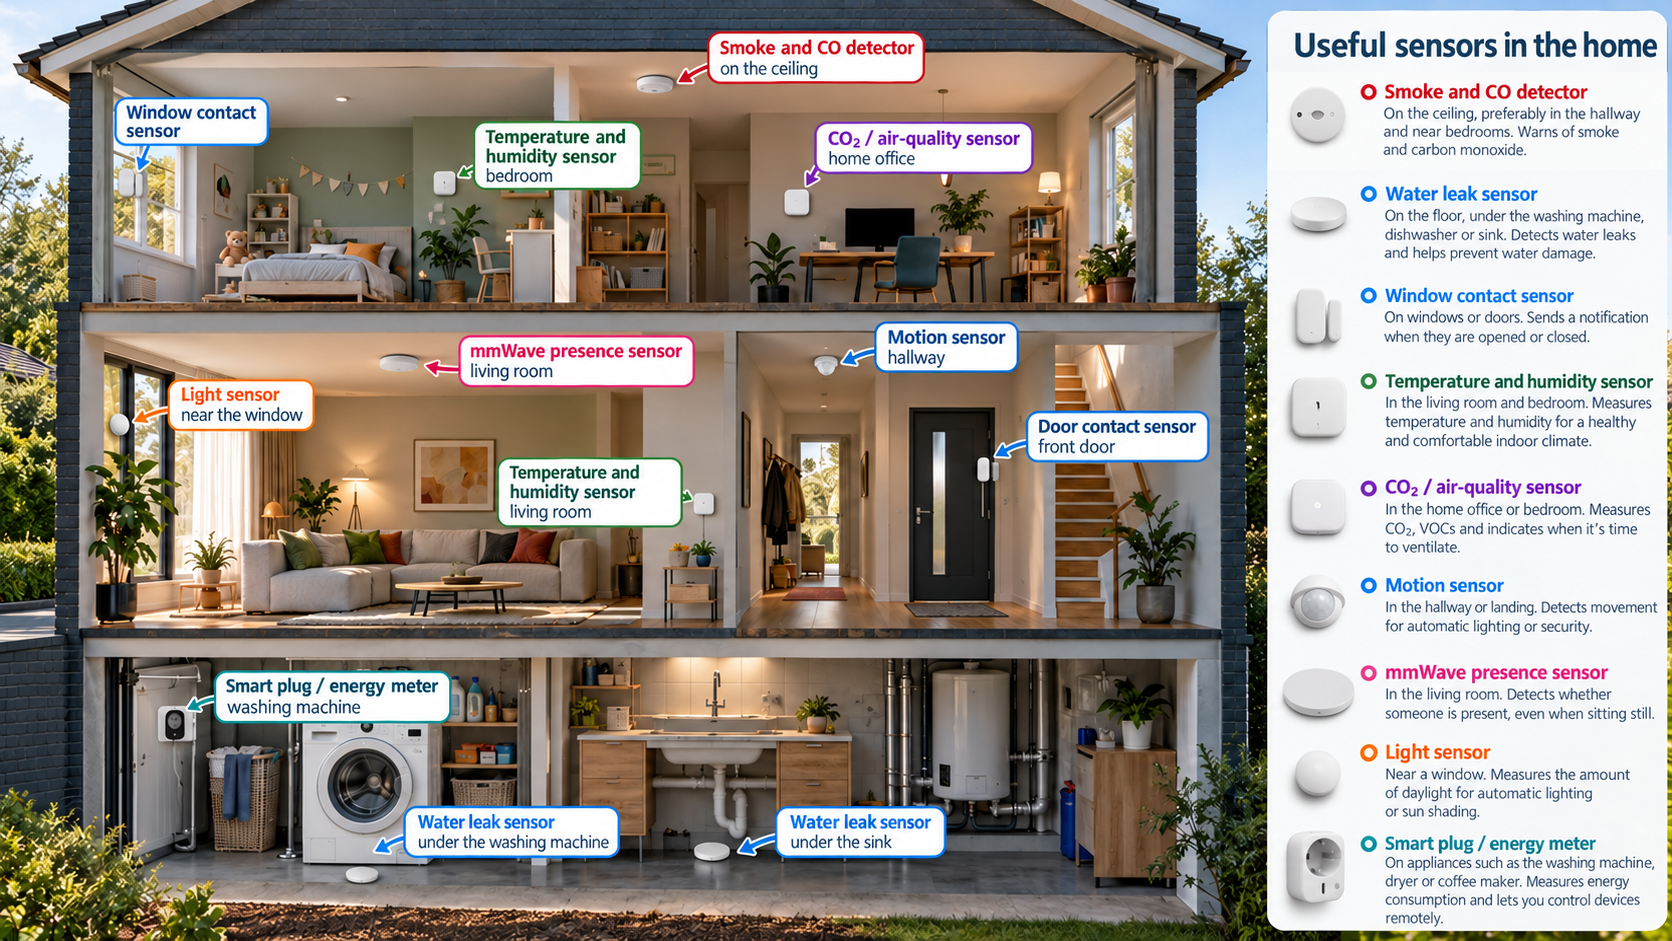
16. Which sensors belong in each room?
A useful starting point by room often looks like this:
| Room | Core sensors | Strong additions |
|---|---|---|
| Living room | Temperature, presence | CO₂, lux, VOC, energy |
| Bedroom | Temperature, humidity | CO₂, mmWave, window contact |
| Bathroom | Humidity | Temperature, PIR, leak detection |
| Hallway | PIR, door contact | Lux, Alarmo context |
| Kitchen | Leak detection | VOC/PM2.5, energy, contact |
| Utility room | Leak detection, energy | Temperature, door contact |
| Home office | Temperature, presence | CO₂, lux, energy |
| Outdoors | Temperature | Rain, wind, lux, soil moisture |
17. PIR or mmWave? The practical choice
| Property | PIR | mmWave |
|---|---|---|
| Detects | Motion | Presence + small movement |
| Battery | Often very long-lived | Often mains powered or shorter battery life |
| Response | Very fast | Fast; filtering may be needed |
| Sitting still | May miss it | Strong |
| False detection | Usually predictable | Can be more environment-sensitive |
| Ideal for | Hallway, toilet, walking route | Living room, office, bedroom |
| Cost | Low | Usually higher |
My preference: use PIR where detecting movement is enough and mmWave only where actual occupancy matters. In a living room or workplace, the combination is often stronger than either alone.
18. Sensor fusion: when separate sensors become a smart system
The biggest improvement often comes not from a “better” sensor, but from combining simple signals.
Examples:
- Motion + lux → lighting only when someone enters and it is dark enough.
- CO₂ + presence → increase ventilation only in rooms actually being used.
- Front door + phone/Wi‑Fi → more reliable arrival detection.
- Open window + active heating → temporarily reduce heating.
- Power + timer → mark the washing machine “finished” reliably.
- Humidity + rate of increase → detect a shower without a button.
This is precisely why Home Assistant is so powerful: you do not have to wait for one manufacturer to pack everything into one device. You can combine small signals into meaningful context.
19. Zigbee, Wi‑Fi, Thread, BLE or wired?
The sensor measurement is one thing; the connection is a second design choice.
- Zigbee: very suitable for battery-powered sensors, with mesh networking and a wide selection.
- Wi‑Fi: useful for mains-powered equipment and devices needing more data, less ideal for many small battery sensors.
- Thread/Matter: increasingly relevant, but Matter is the application standard and Thread one possible network transport.
- BLE: useful for proximity and inexpensive sensors, often through Bluetooth proxies.
- Wired: very reliable where cabling is practical; relevant to new builds, technical installations and alarm-like applications.
Choose not only on “works with Home Assistant”, but also on power supply, range, maintenance and local availability.
20. Placement often matters more than the sensor itself
An excellent sensor in a poor position provides poor data. The most common mistakes are:
- A temperature sensor in sunlight or above a radiator.
- A CO₂ sensor immediately beside an open window.
- A PIR sensor pointing at a heat source or outside window.
- mmWave configured so sensitively that motion in the next room is detected.
- A lux sensor directly below a lamp.
- A leak sensor not at the lowest point.
- An outdoor sensor without sun or rain protection.
Calibrate the location, not just the sensor. Move the sensor first when values seem strange. A software offset cannot always correct a systematic measurement error caused by poor placement.
21. Battery, reporting and maintenance
Battery sensors are convenient only if you maintain them. A sensor that has been unavailable for three months helps nobody.
- Create a dashboard or automation for low batteries.
- Check
unavailableentities. - Use sensible update intervals.
- Avoid unnecessarily rapid reporting for slow-changing values.
- Note unusual battery types or keep spares.
- Test safety and leak sensors periodically.
For temperature and humidity, measuring every second is usually pointless. For motion or leaks, you want an almost immediate response. Appropriate update behaviour depends on sensor type.
22. How Home Assistant understands sensors
Home Assistant uses sensor and binary-sensor entities. A regular sensor has a measurement, such as 20.4 °C or 612 ppm. A binary sensor has two states, such as open/closed or motion/no motion.
The device class tells Home Assistant what a value means. That allows it to use the right icons, units, labels, triggers and dashboard behaviour. If you create template sensors yourself, choosing the right device class is therefore important. Good device classes make your system not only more attractive but also easier to automate.
The smallest useful set
23. The minimum set I would choose for most homes
If someone asked where to start, I would not buy twenty sensors at once. I would roughly do this:
- Temperature/humidity in the living room and bedroom.
- Door contacts on the most important exterior doors and perhaps frequently opened windows.
- PIR in the hallway, toilet and passageways.
- mmWave in the living room or home office if sitting still causes a problem.
- A water-leak sensor by the washing machine and dishwasher.
- One good CO₂ sensor in the living room or bedroom.
- Energy/power measurement on devices whose status or consumption you genuinely want to know.
- Lux where automatic lighting or blinds benefit from it.
Smoke and CO detectors are separate from this list: a safe home should have them as independent safety devices in any case; smart-home integration is supplementary.
24. What do you usually not need?
- The same full multi-sensor in every room.
- CO₂ in a room where nobody stays for long.
- mmWave in every hallway when PIR works well.
- Lux in rooms where lighting is never automated.
- Sound sensors without a clear use case.
- A weather station when public weather data is sufficient for your application.
- Sensors simply because they are cheap.
The best sensor architecture is not the largest. It is the smallest set that provides enough information for your home to respond well.
25. Final checklist: before buying a sensor
- Which concrete question must this sensor answer?
- Which automation or decision uses the measurement?
- Might I already have this information from another device?
- Is a battery or mains supply logical in this location?
- Does Zigbee/Wi‑Fi/Thread/BLE fit my network?
- Can the sensor work locally with Home Assistant?
- Can I mount it in a representative position?
- Is the update frequency appropriate?
- Must it also work when the internet is down?
- How will I notice if the sensor fails or becomes
unavailable?
26. Conclusion
The most useful sensors are not necessarily the most expensive or technologically advanced. Temperature, humidity, doors, motion, presence, CO₂, lux, leaks and power together provide a surprising amount of context.
The real difference appears when you combine these signals purposefully. Then a collection of sensors becomes a smart home that understands when someone is present, when ventilation is needed, when lights should come on, when energy is wasted and when something is wrong.
In short. Measure what you want to know, place sensors well, combine signals where that adds value, and automate only when the result is predictable and useful.
Sources and further reading: official Home Assistant documentation on Sensor, Binary Sensor, Air Quality and Individual Device Energy. For safety detectors, the manufacturer’s documentation and applicable safety guidelines remain authoritative.