
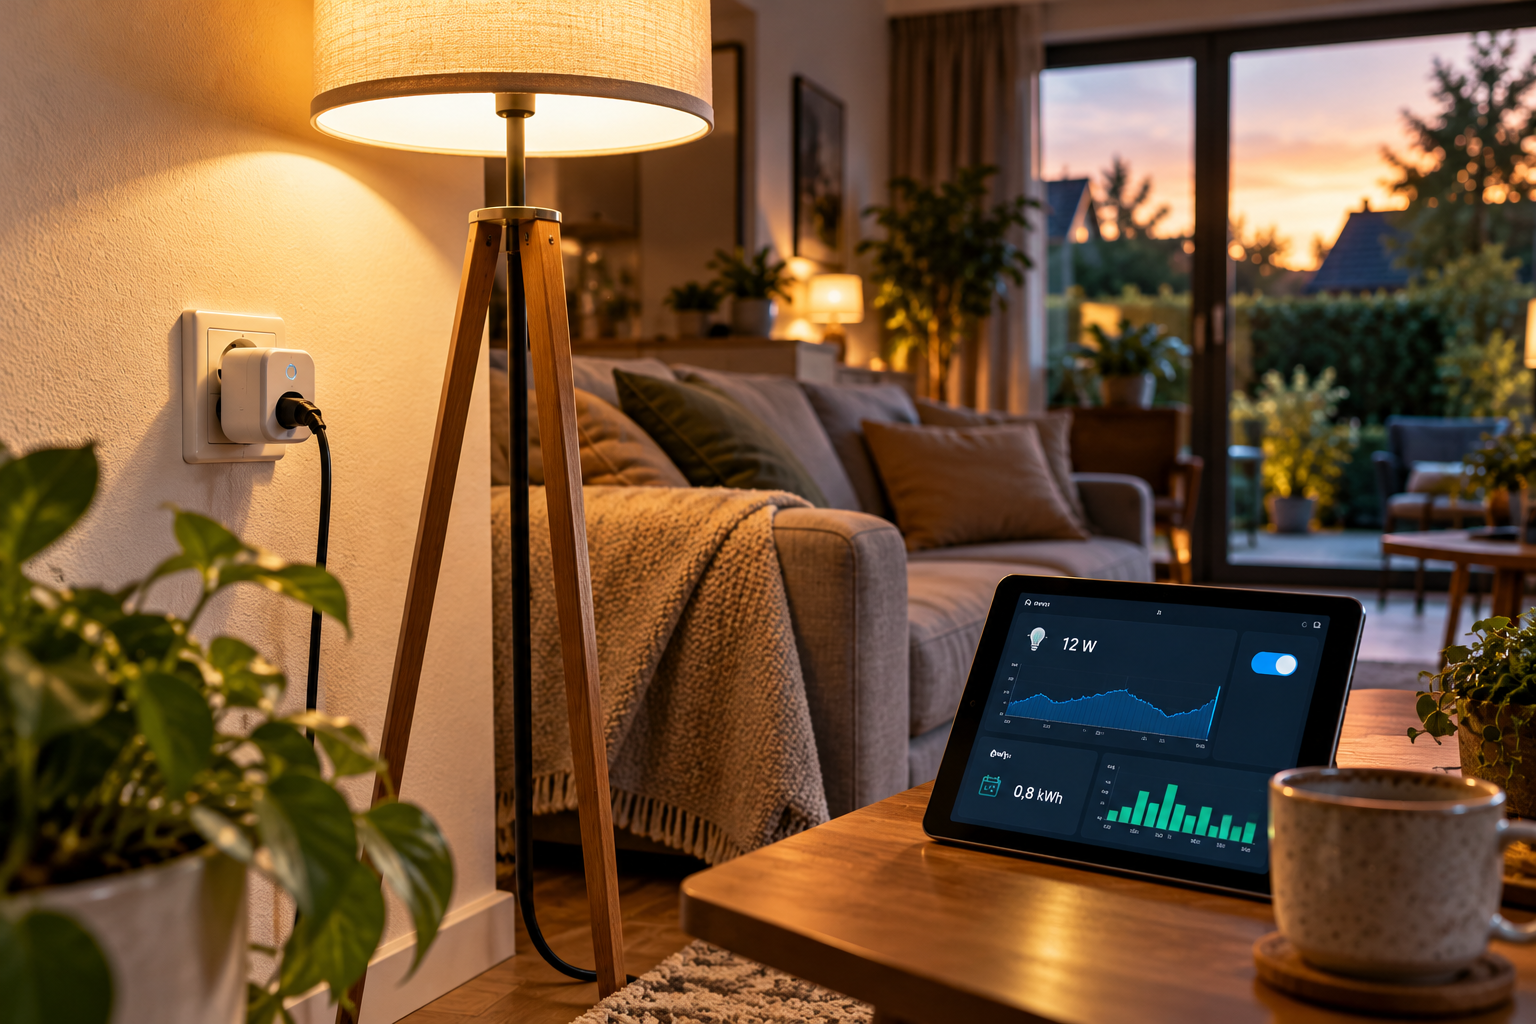
From on/off switching to energy analysis, appliance detection and smart automation in Home Assistant: this expanded guide is for beginners and advanced users alike.
The key idea: a smart plug can be much more than a remotely controlled socket. With power measurement, it becomes a sensor that lets Home Assistant see whether an appliance is running, has finished, has standby consumption, or could be used at a more favourable time.
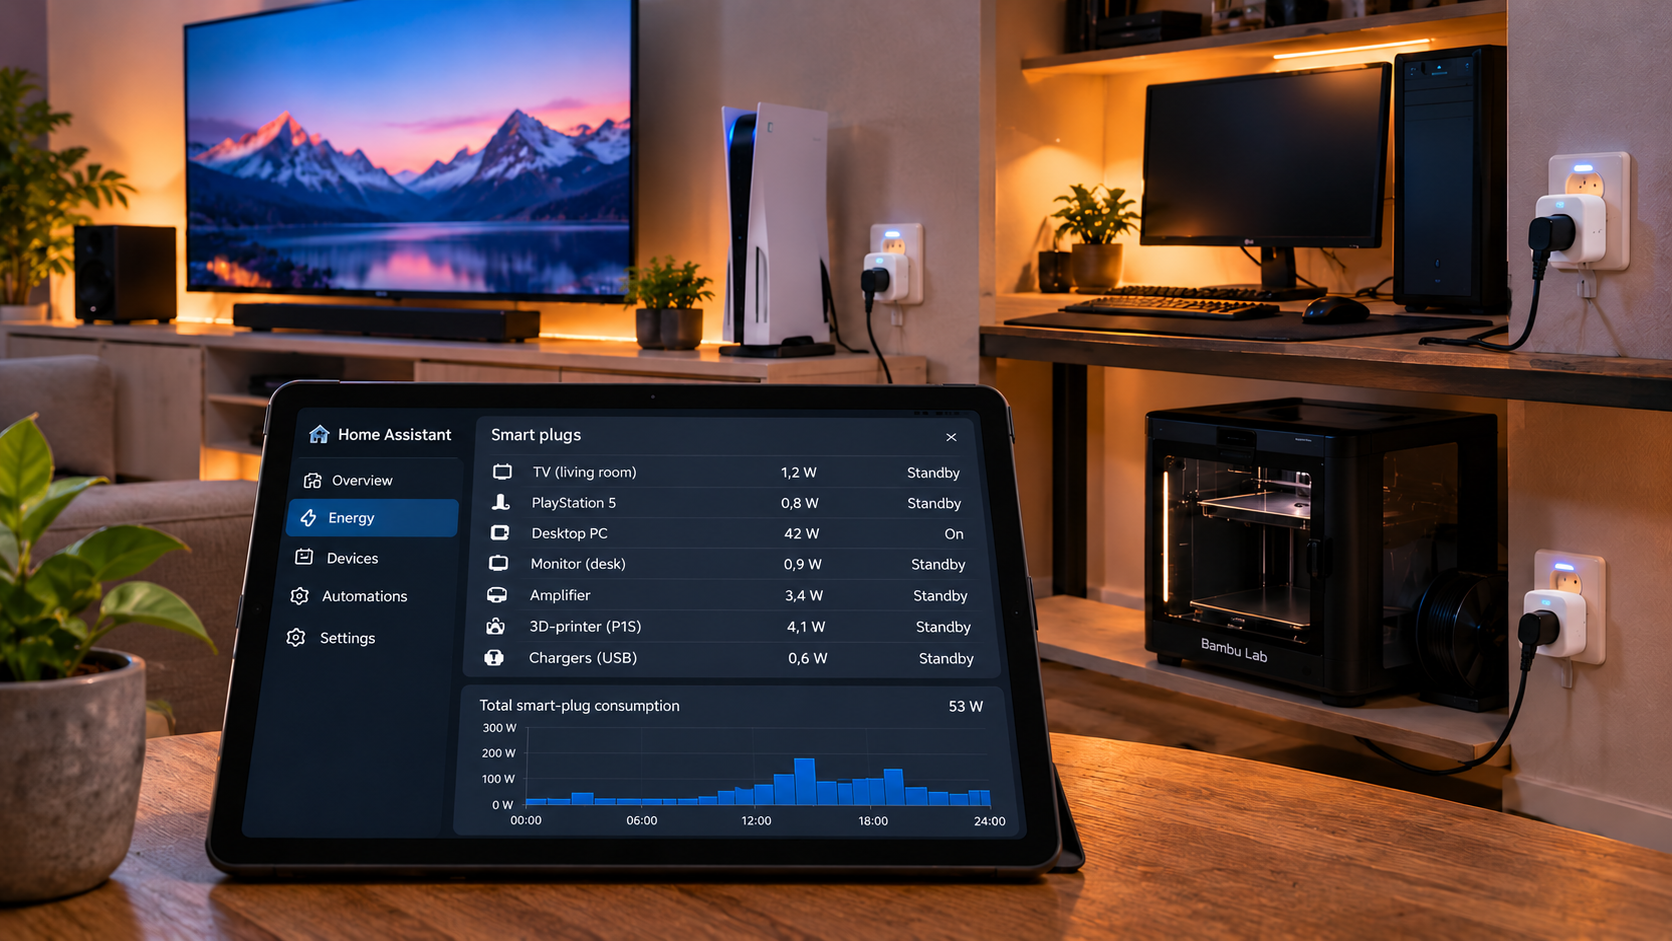
The dashboard images in this guide are realistic illustrations. The exact interface and available sensors vary by brand and integration.
How to read this guide: read chapters 1 through 6 before buying a plug or connecting a high-load appliance. Use the rest as a recipe book for measuring, recognising, automating and saving energy.
1. What is a smart plug?
A smart plug sits between the wall socket and an appliance. In Home Assistant it usually appears as a switch with which you can turn the socket on or off. Many models also provide sensors for current power, voltage, current, energy and sometimes even frequency or power factor.
That distinction matters. A plug that only switches is useful for lights or simple appliances. A plug with energy monitoring can also tell you what the connected appliance is doing.
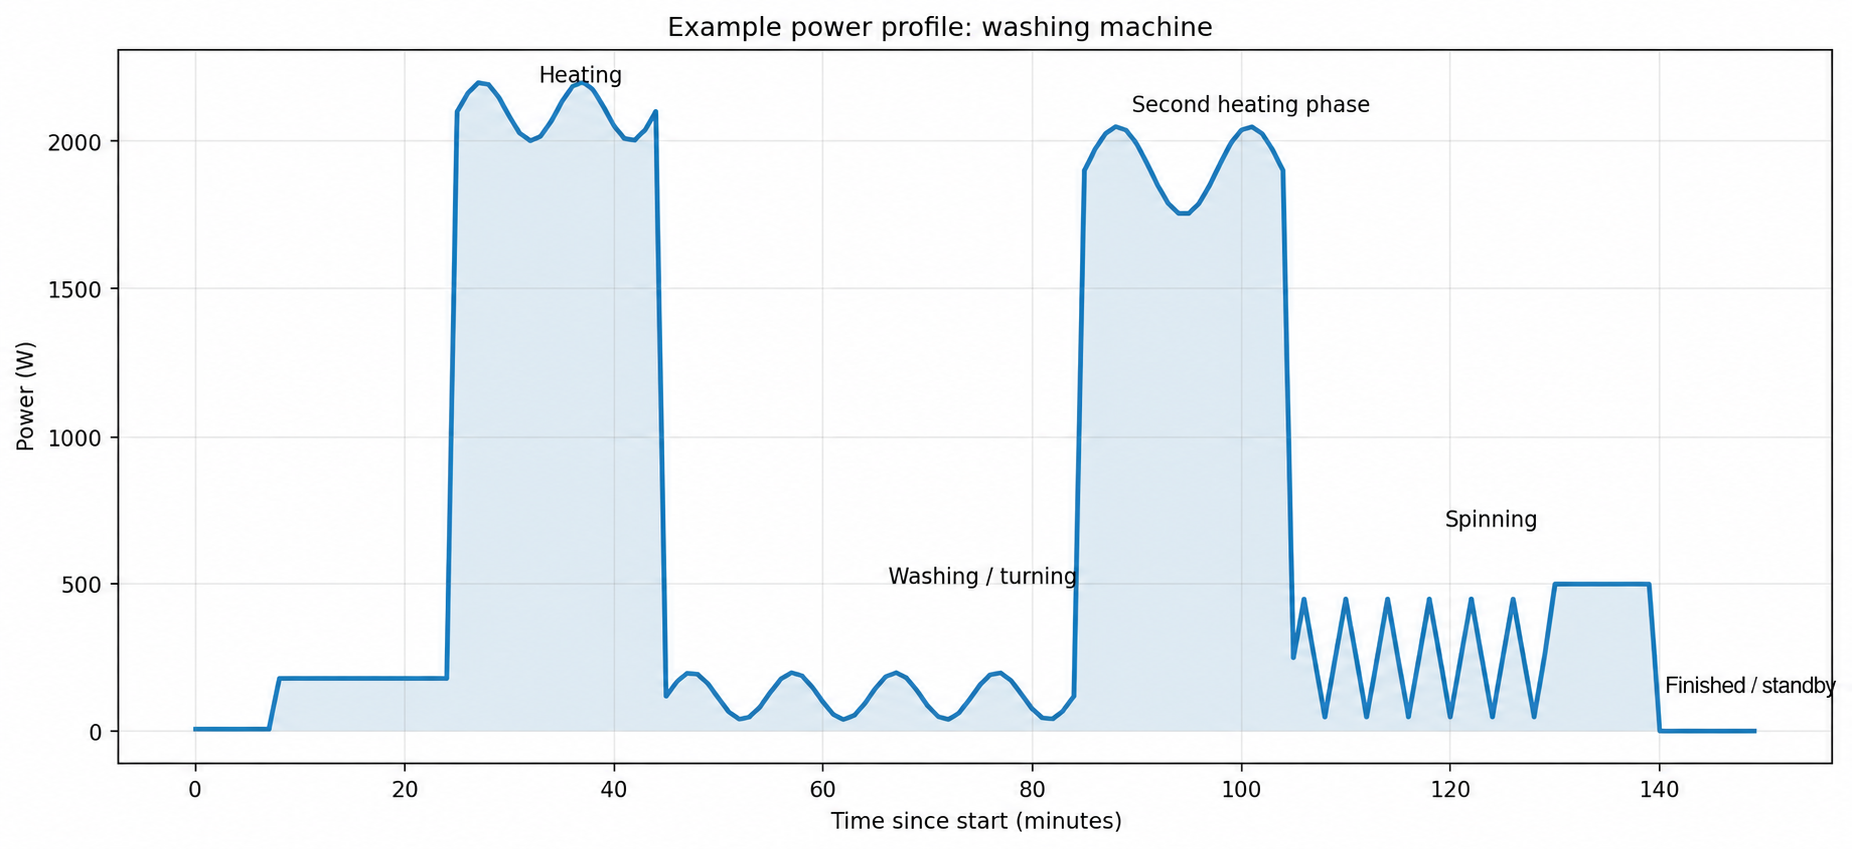
Consider a washing machine: if its power remains above a threshold for a while, Home Assistant knows the programme has started. If it later drops back to nearly zero for several minutes, you can send a “laundry finished” notification. The plug thus becomes an indirect appliance sensor.
In Home Assistant, the switch entity manages the on/off state. Standard switch actions include switch.turn_on, switch.turn_off and switch.toggle.
2. Four functions: switch, measure, recognise and automate
A smart plug can have four roles in a well-designed Home Assistant installation.
- Switch: turn a lamp, charger, fan or another suitable appliance on and off from a dashboard, schedule, button or automation.
- Measure: a plug with power measurement shows how many watts an appliance uses now and how much energy it has consumed over hours or days.
- Recognise: a power profile can reveal what an appliance is doing. A washing machine, dryer, coffee maker or 3D printer often has recognisable states: off, standby, active, heating and finished.
- Automate: the measurement becomes a trigger. Home Assistant can react to “power rises above 20 W”, “stays below 3 W for 3 minutes” or “daily consumption exceeds 2 kWh”.
3. Power versus energy: understanding W and kWh
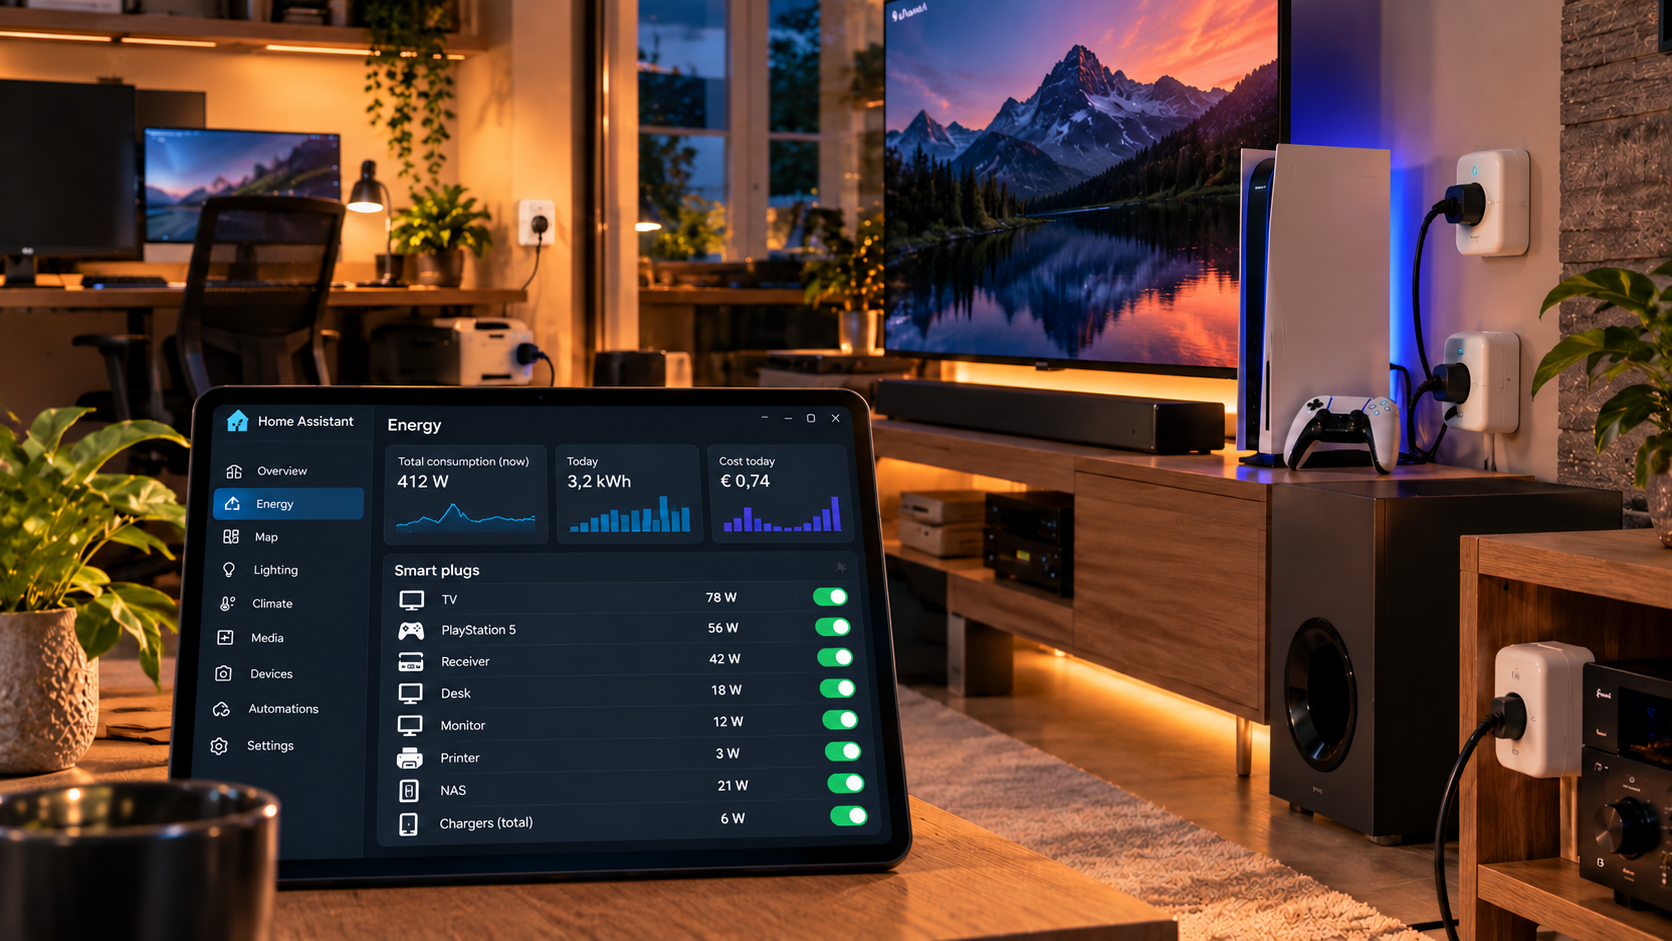
The two most common values are often confused. Power is what an appliance draws at this moment. It is measured in watts (W) or kilowatts (kW). Energy is the amount used over time. It is measured in kilowatt-hours (kWh).
For appliance detection you mainly use power. For costs, daily consumption and the Energy dashboard you mainly use energy.
Example: a heater drawing 1,800 W for two hours consumes about 3.6 kWh. A plug may therefore show 1,800 W as the current reading and later 3.6 kWh as accumulated energy.
4. Which smart plug suits Home Assistant?
When buying, do not look only at price or maximum amperage. Other properties matter just as much for Home Assistant.
- Local integration: does the plug work without a mandatory cloud?
- Power measurement: does it provide W and preferably kWh too?
- Update frequency: are changes reported quickly enough?
- Maximum load: does it match the real appliance, including peaks?
- Physical button: useful if Home Assistant or the network goes down.
- Behaviour after power loss: does it stay off, turn on or restore its previous state?
- Size: does the plug block the adjacent wall socket?
- Protocol: does Wi-Fi, Zigbee, Z-Wave or Matter fit your network?
5. Wi-Fi, Zigbee, Z-Wave and Matter
| Protocol | Strength | Consideration |
|---|---|---|
| Wi-Fi | No separate coordinator needed; often fast measurement | More Wi-Fi clients; cloud dependence varies by brand |
| Zigbee | Mesh, local, good for many devices | Router quality and coordinator determine network quality |
| Z-Wave | Strong mesh protocol; local integrations | Smaller range and often more expensive |
| Matter | Interoperability between ecosystems | Energy measurement and functions vary by product and integration |
The best choice is therefore not automatically the newest protocol. Reliable local integration, measurement quality and suitable electrical rating matter more than a logo on the box.
6. Safety: what can and cannot be switched?
This is the most important chapter. A smart plug is a switch with electronics and relay contacts. Its stated maximum load is not permission to run every appliance at that limit continuously.
Relatively simple loads
Lights, much consumer electronics and small appliances are generally straightforward. Even here, power must remain within the specifications.
High continuous loads
Electric heaters, boilers, kettles and other heating loads can draw substantial current for a long time. Use only a product explicitly suitable for this and keep a safety margin. Heat build-up in the plug, wall socket and contacts matters at least as much as the “16 A” number.
Motors, compressors and power supplies
Refrigerators, freezers, pumps, vacuum cleaners and large power supplies can have high inrush current. That brief peak may be much higher than normal power consumption.
Do not do this without specifically designed hardware
- Use a normal smart plug as the main switch for EV charging.
- Switch heavy fixed installations or large heating loads outside the product specification.
- Use a smart plug as a safety relay or emergency stop.
- Switch several high-load appliances through one power strip behind a single smart plug.
Washing machines and dishwashers: measuring is often more useful than switching. Do not abruptly cut power to a running programme. Mainly use the plug to recognise consumption and send notifications.
7. Power measurement as a sensor
Once a smart plug measures current power, you gain a surprisingly capable sensor. You can infer states without the appliance itself needing to be “smart”.
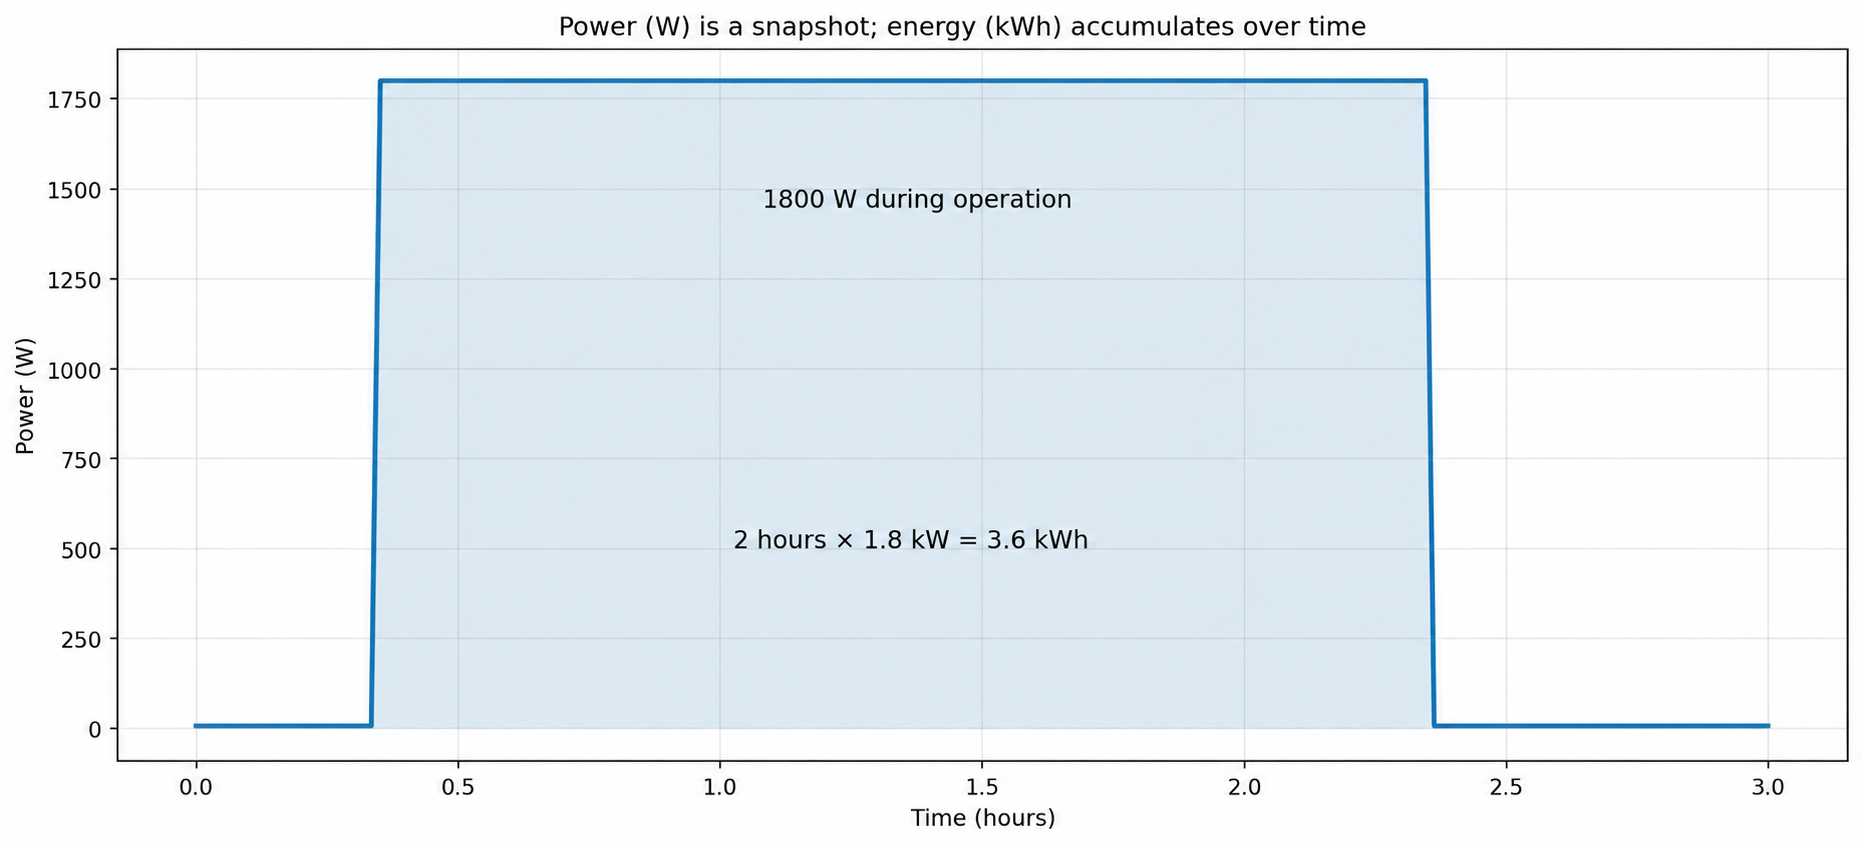
- TV area: 1-5 W may mean standby; 80-250 W indicates active use.
- Printer: nearly 0 W at rest, a short high peak while heating or printing.
- Washing machine: large heating peaks interspersed with motor consumption.
- Coffee maker: a short peak while heating, then nearly zero.
- Computer workspace: a clear transition between off, standby and active.
Never use a power threshold blindly. Measure for a few days first and then choose thresholds that suit your appliance.
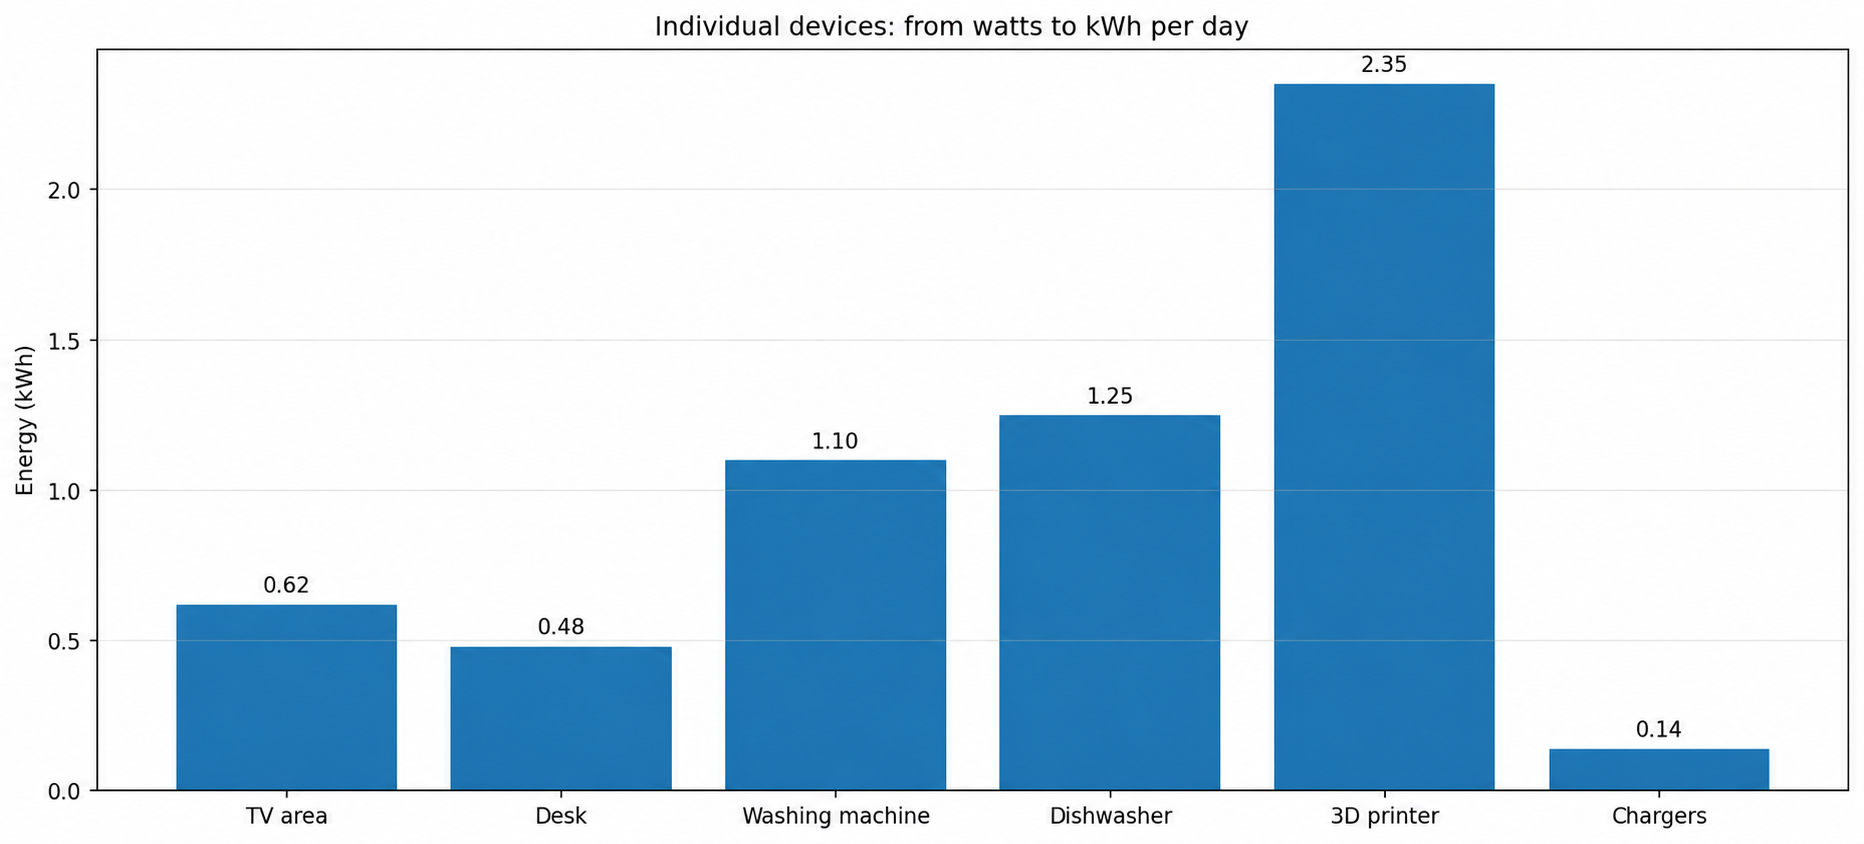
8. Individual devices in the Energy dashboard
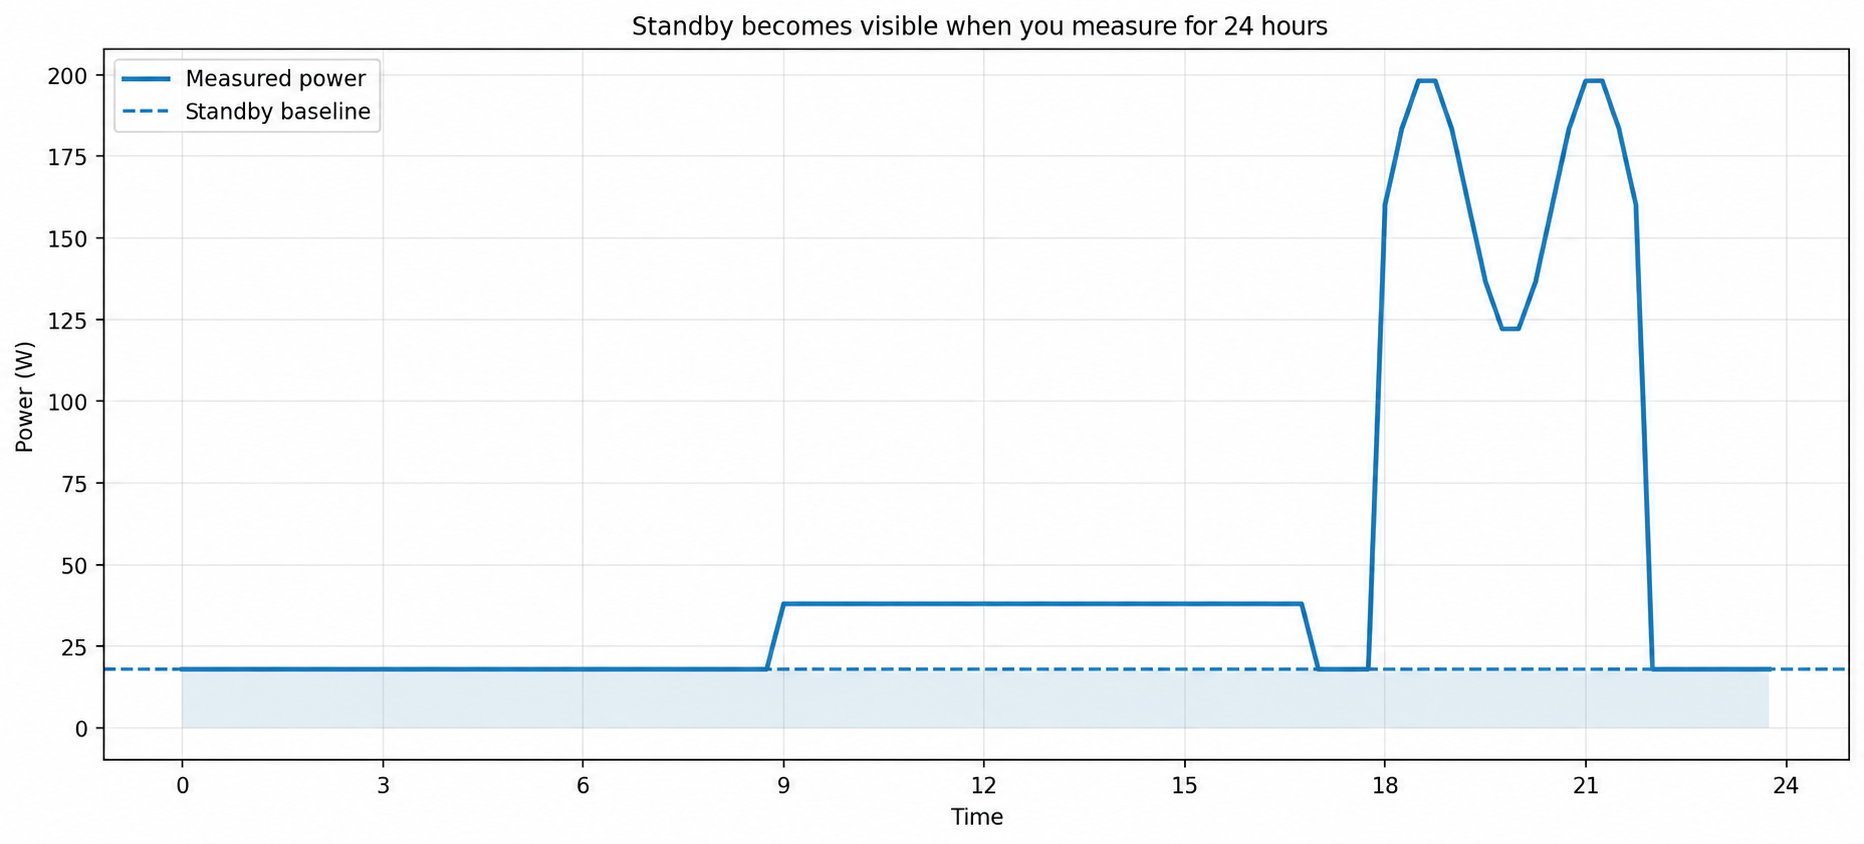
Home Assistant can include individual devices in the Energy dashboard. A smart plug with a valid energy sensor (kWh) is ideal. If you only have a power sensor in W, Home Assistant can build an energy entity through the Integration/Riemann-sum integration.
This is useful because you see not only total household consumption but also how much individual appliances contribute. In recent Home Assistant versions, you can also link individual energy devices hierarchically to an upstream meter or circuit to prevent double counting.
Tip: use the Energy dashboard for long-term energy (kWh) and your own dashboard for live power (W), status and automations. These answer two different questions.
9. Recognising a washing machine and dishwasher
This is probably the most popular use of a metering smart plug. Your old washing machine does not suddenly become “smart”, but Home Assistant can reliably recognise when a programme has started and finished.
A robust method has two steps: first establish that the appliance really is running, then wait until power stays low for several minutes. This prevents a brief pause in the middle of a programme from being mistaken for “finished”.
10. Example: notify when the washing machine finishes
A simple state machine with a helper is usually more reliable than a single threshold.
Step 1 – mark the washing machine as active
alias: Wasmachine gestart
triggers:
  - trigger: numeric_state
    entity_id: sensor.wasmachine_power
    above: 10
    for: "00:02:00"
actions:
  - action: input_boolean.turn_on
    target:
      entity_id: input_boolean.wasmachine_actief
mode: single
Step 2 – only report “finished” when power remains low
alias: Wasmachine klaar
triggers:
  - trigger: numeric_state
    entity_id: sensor.wasmachine_power
    below: 3
    for: "00:03:00"
conditions:
  - condition: state
    entity_id: input_boolean.wasmachine_actief
    state: "on"
actions:
  - action: notify.mobile_app_telefoon
    data:
      title: Wasmachine
      message: De was is klaar.
  - action: input_boolean.turn_off
    target:
      entity_id: input_boolean.wasmachine_actief
mode: single
Why the delay? Many appliances pause during a cycle. A for period prevents a brief dip to 0-3 W from immediately sending a finished notification. Home Assistant supports numeric/Power-threshold triggers for this.
11. Make standby consumption visible and address it
Standby is not always waste. Some devices need to remain reachable, retain clocks or perform updates. The aim is therefore not to “turn off everything that uses 2 W”, but to distinguish useful from unnecessary baseline consumption.
Good candidates for standby management
- The TV area when nobody is home.
- Desk equipment outside working hours.
- Chargers left plugged in for days.
- Printers and peripherals used only a few times a week.
Poor candidates
- Router, access points, Home Assistant host or network switches.
- Refrigerator and freezer.
- Medical or safety-critical equipment.
- Devices that do not tolerate unexpected power loss well.
Calculate the actual saving first. A continuous 5 W is about 44 kWh per year. That can be worthwhile, but an automation should not create more annoyance than it saves.
12. Make the TV area, desk and chargers smarter
A complete entertainment setup may consume tens of watts on standby while receiver, subwoofer, console, TV and peripherals all wait. A single smart plug for the whole power strip may be tempting, but check the total load and consider whether every device may abruptly lose power.
A better approach may be several plugs: one measures the TV area as a group, while another switches only the genuine standby consumers. A NAS or media box can then remain available when needed.
13. Combine presence and smart plugs
Presence can make a plug genuinely smart. Examples: desk sockets off 15 minutes after the last person leaves; mood lighting only when someone is home; chargers off at night; the coffee area enabled only when someone comes downstairs in the morning.
Design rule: never let presence cut power to devices that could lose data, are running a programme or must remain safely on. Use presence mainly for comfort and standby functions.
14. Monitor a 3D printer and other equipment
A 3D printer is a good example of why measuring is often more valuable than merely switching. A smart plug shows current load, daily use and unexpected situations. Abruptly switching off a printer halfway through a print is obviously not a normal automation.
Useful options include:
- Notify when the printer unexpectedly draws substantial power while it should be idle.
- Automatically log standby consumption.
- Only switch off power after a print has completed and the printer has cooled safely, if the printer or firmware permits it.
- Calculate cost per print from kWh and the energy tariff.
The same principle applies to servers, audio equipment, tool chargers and hobby electronics: measure first, understand next and only then consider switching.
15. Dynamic prices and surplus solar energy
A smart plug can also be part of energy planning. It need not start the appliance itself: it might only measure, or enable a non-critical load when the energy price is low or your solar panels produce sufficient surplus.
This can work for appliances that start automatically after power is restored, but many modern washing machines and dishwashers do not restart when power returns. A start recommendation, timer built into the appliance or another integration is then better than simply turning on the plug.
With dynamic tariffs, price is not the only factor. Consider solar production, grid load, desired finish time and comfort. A smart plug is one building block in a larger system.
16. Home Assistant automations with power thresholds
Home Assistant now has specific measurement triggers for power and other values. In YAML you can also use the general numeric-state trigger.
Example – warning for unexpectedly high power
alias: Hoge belasting slimme stekker
triggers:
  - trigger: numeric_state
    entity_id: sensor.werkbank_power
    above: 2500
    for: "00:00:20"
actions:
  - action: notify.mobile_app_telefoon
    data:
      title: Hoge belasting
      message: De werkbank gebruikt al 20 seconden meer dan 2500 W.
mode: single
Example – switch off the desk after departure
alias: Bureau standby uit na vertrek
triggers:
  - trigger: state
    entity_id: person.dennis
    from: home
    to: not_home
    for: "00:15:00"
conditions:
  - condition: numeric_state
    entity_id: sensor.bureau_power
    below: 25
actions:
  - action: switch.turn_off
    target:
      entity_id: switch.bureau_stekker
mode: restart
17. Restore state and behaviour after a power outage
One of the most overlooked settings is what the plug does when power returns after an outage. Depending on the product, it may stay off, turn on automatically or restore its previous state.
For a light, “previous state” may be convenient. For a heater, automatically turning on after an outage may be undesirable. For a refrigerator, you generally want power to return.
Test this deliberately. Unplug the smart plug from the wall socket, wait a moment and reconnect it. Then check both its physical output and the Home Assistant status.
Think fail-safe: decide for each appliance which state is safest when Home Assistant, Wi-Fi or the plug itself restarts. Comfort comes after a predictable safe state.
18. Accuracy, calibration and update frequency
Not all smart plugs measure equally accurately. Especially with very low loads, 0.5 W versus 2 W is a large relative difference. For larger household loads, absolute error usually matters more than a few tenths of a watt.
If possible, compare the measurement with a reliable energy meter. Pay particular attention to:
- A stable load of, for example, 50-100 W.
- A high load of 1-2 kW, within safe limits.
- Standby below 5 W.
- Whether energy (kWh) accumulates logically after several hours.
- How quickly the integration publishes new power readings.
For appliance detection, consistency is often more important than laboratory accuracy. If a plug always shows roughly the same pattern, you can build good automations around it.
19. Local control, cloud and network security
Local control is attractive in Home Assistant because automations then do not depend on the internet or an external service. Wi-Fi smart plugs may work entirely locally, depend entirely on the cloud or fall somewhere in between. Check this before buying.
Zigbee and Z-Wave are often local in practice through the coordinator. Matter can communicate locally, but available functions depend on the product and implementation.
Network security remains important: keep firmware updated, use unique passwords where relevant, do not make IoT devices unnecessarily reachable from the internet and do not open port forwarding for an individual plug.
For important functions, a physical button or local fallback remains useful. You should not need to open a dashboard just to turn off a lamp.
20. Common mistakes
| Mistake | Why it is a problem | Better approach |
|---|---|---|
| Looking only at “16 A” | Does not capture continuous load, heat and inrush current | Check product specification and load type |
| Abruptly switching off a washing machine | The programme or data may be lost | Measure and notify; do not switch during a cycle |
| Choosing 1 W as a hard threshold | Sensor noise and standby levels vary | Measure the real profile first |
| Automatically cutting router standby power | You switch off your own infrastructure | Keep critical network equipment available |
Omitting a for time |
Brief dips are seen as the end | Apply debounce or delay |
| Buying a cloud-only plug | Automations stop when internet or cloud fails | Prefer local integration |
| Putting everything behind one plug | Load and logic become hard to understand | Divide groups deliberately |
21. Twelve practical applications
- Washing-machine finished notification based on power.
- Dishwasher finished notification without a new dishwasher.
- Eliminate TV-area standby when nobody is home.
- Automatically switch off desk equipment after working hours.
- Track a 3D printer’s energy consumption per print.
- Enable chargers only during a selected time window.
- Detect coffee maker states: heating, finished, standby.
- Signal unexpected consumption from devices that should be off.
- Add daily and monthly consumption per device to the Energy dashboard.
- Only enable a portable air conditioner or fan within a comfort rule.
- Use surplus solar energy for suitable flexible loads.
- Use dynamic price information for advice or non-critical switching.
The best applications measure first: a smart plug is often most valuable when it first provides information. Once you know how an appliance behaves, you can decide whether switching really adds anything.
22. Final checklist before using a smart plug
- Is the electrical load suitable for this plug?
- Do I know the maximum continuous load and the load type?
- Do I want only switching or also measurement?
- Can the plug communicate locally with Home Assistant?
- Does it provide W and/or kWh sensors?
- What does it do after a power outage?
- May the connected appliance abruptly lose power?
- Have I measured its normal power profile first?
- Do my automations have enough delay?
- Is the appliance important enough never to be switched off automatically?
Conclusion
A smart plug may be one of the least expensive ways to make an existing appliance much smarter. Not because the plug understands the appliance, but because Home Assistant can infer context from its energy behaviour. You can therefore monitor old appliances, recognise status, understand costs and build useful notifications or automations.
The best results combine three things: safe switching, useful measurement and calm automation. That makes a simple plug a surprisingly powerful building block for your smart home.
Sources and current documentation
- Home Assistant – Switch integration: states and switch actions.
- Home Assistant – Home Energy Management and Individual Devices: smart plugs, per-device energy and upstream hierarchy.
- Home Assistant – Power / automation triggers: reacting to power thresholds.
Consulted October 2026.